Disclaimer: This post includes affiliate links that I may get compensation from if you decide to make a purchase. Thank you for the support!
Rainbow Ridges Jar Cozy… Free Crochet Pattern!

Rainbow Ridges Jar Cozy… Free Crochet Pattern!

Rainbow Ridges Jar Cozy

Rainbow Ridges Jar Cozy... Free Crochet Pattern

If you love this pattern… Save it to your Ravelry favorites!!  Click Here…


I love decorating my home with colorful crochet!!  After whipping up a few Rainbow Ridges Can Cozies..  I decided my spoon jar needed some sprucing up!!  With a slight amount of pattern changing… You can make the Rainbow Ridges Jar Cozy to fit any size jar, bottle or can!!  This pattern is for a Pint Mason Jar, and at the bottom of the pattern I will give you the stitch count for adjusting to other sizes…  Let’s brighten up our homes for the summer!!


Materials:

Worsted Weight Yarn ~ Multiple colors in just a few yards each… great for stash busting! I used Lily’s Cream and Sugar Cotton in multiple colors!!

Hook ~ H


Stitches:

Ch ~ Chain     St ~ Stitch     Bl ~ Back Loop     FPdc ~ Front Post Double Crochet     Sl St ~ Slip Stitch     Sc ~ Single Crochet     Dc ~ Double Crochet     Reverse Single Crochet

Instructions:

Ch 2

Round 1.  6 sc in the 2nd ch from hook, join with sl st. =6 sc

Round 2.  Ch 1, 2 sc in each st around, join with sl st. = 12 sc

Round 3.  Ch 1, 2 sc in 1st st, 1 sc in next st, *2sc in next st, 1 sc in next st*, repeat * * around, join with sl st to beginning. = 18 sc

Round 4.  Ch 1, 2 sc in 1st st, 1 sc in next 2 sts, *2sc in next st, 1 sc in next 2 sts*, repeat * * around, join with sl st to beginning. = 24 sc

Round 5.  Ch 1, 2 sc in 1st st, 1 sc in next 3 sts, *2sc in next st, 1 sc in next 3 sts*, repeat * * around, join with sl st to beginning. = 30 sc

Round 6.  Ch 1, Bl sc in each st around, join with sl st to beginning. = 30 sts

Round 7.  Ch 3(counts as dc now and throughout), dc in each st around, join with sl st to top of ch 3. = 30 dc

Change colors

Round 8. Join yarn in any st, ch 1, sc in 1st st, FPdc around next st, *sc in next st, FPdc in next st*, repeat around. Join with sl st to beginning. = 15 FPdc and 15 sc

Round 9.  Ch 1, sc in each st around, join with sl st to beginning. = 30 sts

Change colors

Round 10.  Join yarn around any FPdc 2 rounds below, ch 3, *sc in next st, FPdc around next FPdc 2 rounds below*, repeat around, join to top of ch 3 of beginning dc. = 15 FPdc and 15 sc

Round 11.  Ch 1, sc in each st around, join with sl st to beginning. = 30 sts

Rounds 12 – 22.  Repeat rounds 10 & 11 changing color before each repeat.

Change to 1st color

Round 23.  Join in any st, reverse sc around. Join to beginning

Finish off.

Congratulations!!  You now have a Rainbow Ridges Can Cozy!!

Alternations

To change the width of your project you need an even amount of stitches. When you get to row 5, you can add 2 increases evenly so you end up with a total of 32, then follow the directions just keeping in mind your count will be 32, not 30.  If you want it even larger, you can add an extra row after row 5 and sc 2 in a st, then sc in next 4… repeat around. With this increase you will end up with 36 sts.  Just keep in mind that will be row 6 and the following rows will all change-up by one number.  If you want your project taller,,, Just add more rows continuing to use rows 10 & 11 then finish off with row 22 for the last row.

Happy Crocheting!!

Elena


©Copyright 2016 Elena Hunt/Beatrice Ryan Designs.  All my, patterns and posts are my own work. Do not copy them in any way. If you want to share this information with someone, share the link to this post. If you want to share on your own blog website, then you may use the first photo in this post and link back to this post. You may not give away printed copies of this post. Thank you. This post may contain affiliate links/ads. If you purchase something from a link in this post, I may be compensated.


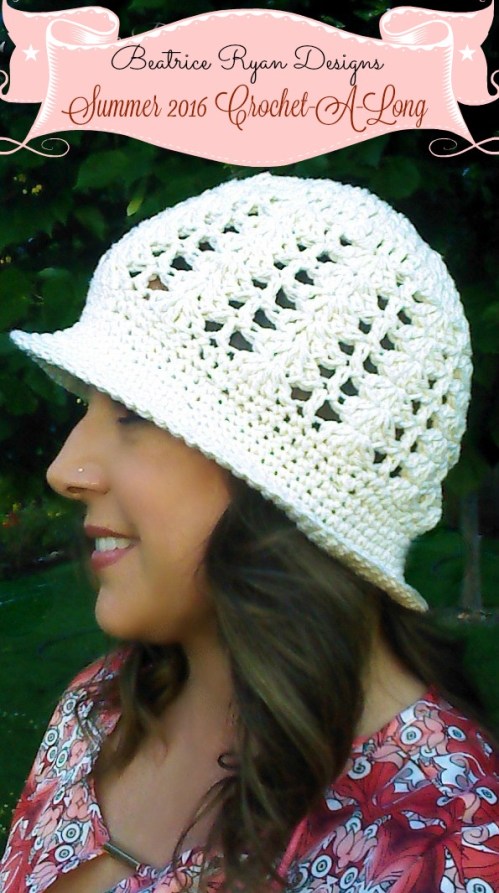
2016 Summer CAL~Sunshine & Shells Summer Hat!! Week 1~ Materials and Gauge!

2016 Summer CAL~Sunshine & Shells Summer Hat!! Week 1~ Materials and Gauge!

Join me in a 3 week Crochet Along journey!!  Simple and stylish, fun to wear!! Sunshine and Shells Summer Hat…

Summer 2016 CAL


If you are ready to start a fun project with me… Week 1 is our preparation week!  Buy your yarn and check your gauge…

Here is what you will need…

Materials:    

Yarn:

Lily ~ Sugar and Cream (Pictured in Ecru) 200 Yard Skein, Total for hat, Approx 160 yards…

Hook:

G or H… or whatever hook makes your gauge work.. I used an H and I crochet loosely.

You can choose any worsted weight yarn you like,,, but make sure you check your gauge.. Here is an article about why its important… Gauge and your project

I want your hat to fit… So after you buy your yarn and gather your hook… Match your gauge to this…

Gauge:    

Hook Size ~ H  3″ x 3′    10 Dc x 5 Rows


Next… Watch my live broadcast on Facebook next Tuesday 6/7 for upcoming tips and chat at 6pm PST!!

Then… Tune in here next Wednesday 6/8 for the top and crown of the hat instructions!

I can’t wait to see all of your hats!!

Week 3 we will add the brim and shape the hat… Then Voila… You have a beautiful Summer Hat!!

Happy Crocheting!

Elena


Tea Time Placemat… Free Crochet Pattern!!

Tea Time Placemat… Free Crochet Pattern!!

Tea Time Placemat

Tea Time Placemat... Free Crochet Pattern!

If you love this pattern,,, Save it to your Ravelry favorites…. Click Here!


Tea Time Placemat is a quick and fun project to add color to your home!!  Simple Double Crochet and Single Crochet makes this free pattern have a unique texture… Great gift idea too!!


Materials:

Worsted weight yarn ~ 200 yards main color 25 yards of accent color per placemat.  Cotton yarn was used in this project, but Acrylic yarn would work great too!

Hook ~ I

Size:

Approximately 16 1/2″ x 12 1/2″

Stitches:

Sk ~ Skip      St ~ Stitch     Sl St ~ Slip Stitch     Ch ~ Chain     Sc ~ Single Crochet     Dc ~ Double Crochet

Instructions:

With main color~

Ch 45

Row 1:  Sc in 2nd ch from hook and each across. = 44 sts

Row 2:  Ch 1, turn, sk 1st st, (sc, dc) in next st, * sk st, (sc, dc) in next st*, repeat * * across. =44 sts

Row 3:  Ch 1, turn, (sc,dc) in each sc across, skipping all the dc’s. =44 sts

Rows 4-29:  Repeat Row 3

Row 30:  Ch 1, turn, sc across. = 44 sts

Edging:

Round 1:  2 sc in same st as last st of row 30(1st corner), sc 29 sts evenly down the side of the rows, 2 sc in same st as 1st st of  beginning of placemat row 1(2nd corner), join with sl st to the 1st st of row 1. Finish off.

Round 2:  Join with sl st in the same space as the last st of row 1(44th st), 2 sc in same st(3rd corner), sc 29 sts evenly up the side of rows, 2 sc in same space as the  1st st of row 30, join with sl st to 1st st of top of placemat(4th corner).=154 sts

Round 3:  Ch 1, turn, sc in 1st st, 3 sc in next st(1st corner), sc in next 31 sts, 3 sc in next st(2nd corner), sc in next 22 sts, 2 sc in next st(increase is needed to end with odd number of sts), sc in next 21 sts, 3 sc in next st(3rd corner) sc in next 31 sts, 3 sc in next st(4th corner), sc in next 21, 2 sc in next st, sc in next 21 sts, join to beginning sc. =164 sts

Round 4:  Ch 3, turn, *sk st, sc in next st, ch 3*, repeat * * 24 times, sc in same st(1st corner), <ch 3, sk st, sc in next st>, repeat < > 17 times, ch 3, sc in same st(2nd corner), repeat < > 24 times, ch 3, sc in same st(3rd corner), repeat < > 17 times, ch 3, sc in same st(4th corner), ch 3, sk st, join to beginning st. = 86 ch3 sps

Change to accent color

Round 5:  Join with sl st in any corner ch3 sp, ch 1, sc in same sp, {dc in next sc, *sc in next ch 3 sp, dc in next sc*, repeat * * across to next ch3 corner sp, 3 sc in  corner ch3 sp}, repeat { } 4 times, finishing with only 2 sc in last corner, join with sl st to 1st sc in the same corner st. = 180 sts   Finish Off.

Change back to main color

Round 6:  Join with sl st in top left center corner st. Ch 1, 2 sc in same st(1st corner), sc in next 37 sts, 2 sc in  next st(2nd corner), sc in next 49 sts, 2 sc in next st(3rd corner), sc in next 37 sts, 2 sc in next st(4th corner), sc in last 49 sts. Join with sl st to beginning. Finish off. =184 sts

Congratulations… You have just completed your Tea Time Placemat!!  Make as many as you like in sets for your home or as gifts!!

Happy Crocheting!!

Elena


Tea Time Placemat close up


©Copyright 2016 Elena Hunt/Beatrice Ryan Designs.  All my, patterns and posts are my own work. Do not copy them in any way. If you want to share this information with someone, share the link to this post. If you want to share on your own blog website, then you may use the first photo in this post and link back to this post. You may not give away printed copies of this post. Thank you. This post may contain affiliate links/ads. If you purchase something from a link in this post, I may be compensated.
%d bloggers like this: