Disclaimer: This post includes affiliate links that I may get compensation from if you decide to make a purchase. Thank you for the support!
Whimsical Warmth Headband ~Version II

Whimsical Warmth Headband ~Version II

If you love my Whimsical Warmth Series… Whimsical Warmth Headband ~ Version II is the 4th free crochet pattern in the series… Easy to make and fun to wear, this fashionable headband pattern is set off with a beautiful set of buttons to make your accessory truly whimsical!!


Whimsical Warmth Headband Version II


Whimsical Warmth Headband Version II

If you love this pattern,,, Please add it to your Ravelry queue for easy access!!  Click Here…


Materials:

Worsted Weight Yarn ~ 150 yards or less total. In this pattern I used Vanna’s Choice Yarn by Lion Brand Yarn in Cranberry, Terra Cotta and Kelly Green!

Buy it now!!

Hook ~  H

Yarn Needle

2 Buttons

Size:

24 1/2″ Laid Flat and 22″ Around Buttoned

Gauge:

2″ x 2″ = 7 sc x 8 rows

Stitches: 

yo ~ yarn over                                                            sk ~ skip

sp ~ space                                                                   st ~ stitch

sl st ~ slip stitch      ch ~ chain                                 sc ~ single crochet

Hdc ~ half double crochet                                       fphdc ~ front post half double crochet

bpfdc ~ back post half double crochet                  rev sc ~ reverse single crochet

dec ~ decrease (insert hook in st, pull up loop, insert hook in next st, pull up loop, yo and draw through all 3 loops on hook.)

Puff Stitch ~ (Yo, insert hook in designated space, pull up a loop) 4 times, yo and pull through all 9 loops on hook, ch 1. Make sure all loop you pull up are a double crochet height.


Instructions:

Ch 64

Row 1:  Sc in 2nd ch from hook and each across. = 63 sc

Row 2:  Ch 1, turn, sc in 1st st, * Ch 1, sk st, sc in next st*, Repeat * * across. = 32 sc & 31 ch 1.

Row 3:  Ch 2 (counts as hdc now and throughout), *puff st in next ch1-sp, ch 1*, Repeat * * arcoss to the last ch 1 sp, puff st in ch1-sp, hdc in last st. = 2 hdc, 31 puff st, 30 ch 1

Row 4:  Ch 1, turn, sc in 1st st, sc in each puff st and ch1-sp across, sc in last st. = 63 sc

Rows 5- 10:  Repeat rows 2-4 two more times.

Do not finish off

Botton Edging:

Row 1:  Ch 1, do not turn, working along the 1st short edge of rows, sc 11 sts evenly across.

Row 2:  Ch 2, turn, hdc in each st across. = 11 hdc

Row 3:  Ch 2, turn, *fphdc, bphdc*, Repeat across to the last 2 sts, fphdc, hdc.  = 2 hdc, 5 fphdc, 4 bphdc

Row 4:  Ch 2, turn, *bphdc, fphdc*, Repeat across to the last 2 sts, bphdc, hdc. = 2 hdc, 5 bphdc, 4 fphdc

Rows 5 & 6:   Repeat rows 3 – 4 one time.

Row 7:  Ch 2, turn, fphdc, bphdc, ch 1, sk st(this is the 1st button hole), bphdc, fphdc, bphdc, ch 1, sk st(2nd button-hole), bphdc, fphdc, hdc.  = 2 hdc, 2 ch1-sp, 3 fphdc, 4 bphdc

Row 8:  Ch1, turn, dec sc, sc in next 7 sts, dec sc. = 9 sc

Row 9:   Ch 1, turn, sc across. = 9 sc  This is the Right Side.

Finish off.

With Right side facing, join with sl st to 2nd short end at corner.

Row 1:  Ch 1, sc 11 sts evenly across.

Rows 2-6:  Repeat rows 2-6 of first side button edging.

Row 7: Ch 1, turn, dec sc, sc in next 7 sts, dec sc. = 9 sc

Edging:

Ch 1, rev sc around.

Finish off.

Sew 2 button onto the base of the short end of the headband edge matching them up to the button holes. You can place the buttons correctly to make the headband fit correctly.

Congratulations… You now have a Whimsical Warmth Headband Version II


Whimsical Warmth Headband Version II buttons


Other Whimsical Warmth Free Crochet Patterns include:

Whimsical Warmth Headband (This is made in the round and not buttoned)      Whimsical Warmth Headband

Ladies Whimsical Warmth Beanie                                                                                   Ladies Whimsical Warmth Beanie multi

Children’s Whimsical Warmth Beanie                                                                             Whimsical Warmth Childrens Hat


*** You may make and sell products from my patterns but if you do I ask that you link back to my post. Please do not copy and post these patterns in part or in full on any website or publication and/or claim it as your own. Please do not re-publish photos as your own.***

Copyright ~ Beatrice Ryan Designs ~October 25, 2015

Ombre Ridges Scarf… New Free Crochet Pattern!!

Ombre Ridges Scarf… New Free Crochet Pattern!!

Ombre Ridges Scarf


The simple and elegant style of this cozy crochet scarf will wrap you in warmth all winter long!!  This Free Crochet Pattern works up quickly using bulky yarn that has a self striping ombre effect and uses only one skein of yarn!!  A great back to school item and gift idea, you can start your winter projects early for those on your holiday list!!


Ombre Ridges Scarf

If you love this pattern, add it to your Ravelry Favorites… Click Here!!!


The Ombre Ridges Scarf measures approximately 5 1/2″ x 72″


Materials~

312 Yards of Bulky (5) Yarn – For the best results use 1 skein of  Lion Brand Yarns” Scarfie” Yarn!!  Pictured here in Cream/Black

Buy it now!!

*Scarfie Yarn comes in several colorways… JoAnn’s Fabrics is a great source Click Here for fantastic coupons!

K Hook
Scissors


Stitches~

Ch ~ Chain     St ~ Stitch     Sl St ~ Slip Stitch     Sk ~ Skip     Sc ~ Single Crochet     Dc ~ Double Crochet     Fptrc ~ Front Post Triple Crochet


Instructions~

Chain 16 loosely
Row 1:  Turn, sc in 2nd ch from hook and each st across. = 15 sc
Row 2:  Ch 3 (counts as dc now and throughout), turn, dc in each st across. = 15 dc
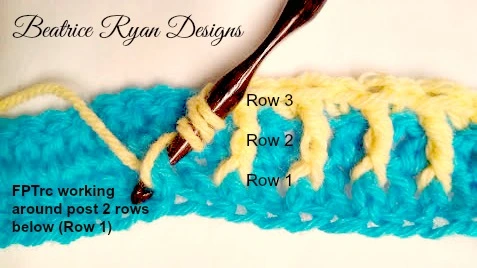
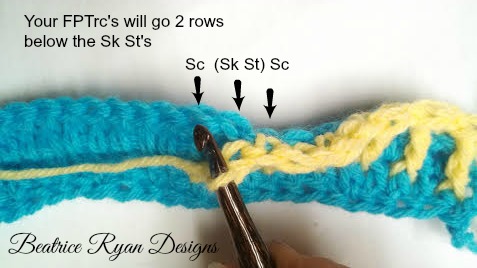
Row 3:   Turn, ch 1, sc in 1st dc, *fptrc in next stitch 2 rows below(Around the Sc of Row 1 directly below, see photo tutorial below), sk st (your fptrc is taking up this stitch below so you need to skip this stitch to avoid extra stitches),sc in next stitch( this will be in the typical stitch area)*. Repeat * * across to end.= 8 sc & 7 fptrc


Row 4:   Turn, ch 3, dc across. =  15 dc
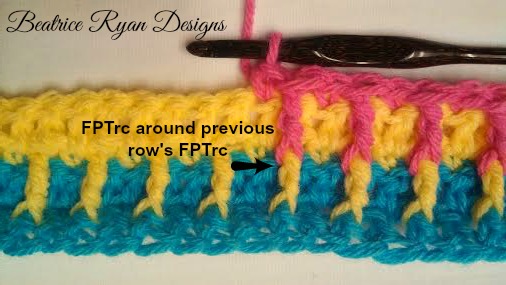
Row 5:   Turn, ch 1 sc in 1st st, * fptrc around the previous rows fptrc (See Photo Tutorial), sk st, sc in next st*, Repeat * * across. = 8 sc & 7 fptrc


Row 6:   Turn, ch 3, dc across. = 15 Dc
Rows 7- 132: Repeat rows 5 & 6
Row 133: Ch 1, Turn Sc across. = 15 Sc
*Due to each skein of yarn varying slightly in length you may need to make stop at row 130 and then make row 131 the single crochet row. If you have extra yarn, feel free to make it longer!!
Finish off
Congratulations!! You have now completed your Ombre Ridges Scarf!!


Happy Crocheting!!
Elena

*** You may make and sell products from my patterns but if you do I ask that you link back to my post. Please do not copy and post these patterns and claim it as your own. Please do not re-publish photos as your own.***

*My site contains Affiliate Links, by clicking on the advertising I may be compensated*


Summer Day’s Baby Blanket

Summer Day’s Baby Blanket

Sweet and Colorful ~  Summer Day’s Baby Blanket is just right to wrap a precious baby in for mild summer days.  This Free Crochet Pattern uses cotton yarn to make it even more comfortable for the warmer days too!!


Summer Day’s Baby Blanket

Make sure to add this to your Ravelry Favorites to help spread the word about this fun, free pattern!!  Click Here!!

This sweet blanket pictured above if made in cotton yarn, but soft acrylic yarn would be great too!! It measures 32″ x 36″.

Materials

Cotton or Acrylic Yarn (pictured above is cotton yarn) 550 Yards White Cotton Yarn, 100 Yards each of Purple, Lime Green, Tangerine and 150 Yards of  Aqua.

J Hook

Scissors

Stitches 

St ~ Stitch     Sp ~ Space     Sk ~ Skip     Sl St ~ Slip Stitch     Ch ~ Chain     Sc~ Single Crochet     Hdc ~ Half Double Crochet      Dc ~ Double Crochet     FPCluster ~ Front Post Cluster

*Front Post Cluster ~ *YO, Draw up a loop around the front post of Dc in previous row, YO, Draw through 2 loops* Repeat * * 2 more time, YO and draw through all 4 loops on hook.

**Tip**  The Right Side will have the FPCluster bump on the front side.

Instructions

Beginning with Aqua~

Ch 80

Row 1:  Sc in 2nd Ch from hook and each across. = 79 Sc

Row 2: Turn, Ch 3 (counts as Dc now and throughout), Sk 2 Sts, 5 Dc in next St(Shell made), Sk 2 Sts, *Sc in next St, Sk 2 Sts, Shell in next St, Sk 2 Sts*, Repeat * * 11 more times, Dc in last St. = 2 Dc, 13 Shells, 12 Sc

Change to White

Row 3:  Turn, Ch 5 (Counts as Dc and 2 Chs), Sk 2 Sts, Sc in next St, Ch 2, Sk 2 Sts, Dc in next St, *Ch 2, Sk 2 Sts, Sc in next St, Ch 2, Sk next 2 Sts, Dc in next St*, Repeat * * Across. = 13 Sc, 26 Ch 2 Spaces, 14 Dc.

Row 4:  Ch 1, Turn, Sc in 1st St, *2 Sc in Ch 2 Sp, Sc in next St, 2 Sc in next Ch 2 Sp, FPCluster around next Dc*, Repeat * * 11 more times, 2 Sc in next Ch 2 Sc, Sc in next St, 2 Sc in last Sp, Sc in 3rd Ch of beginning Ch. = 67 Sc, 12 FPCluster.

Change to Next Color

Row 5:  Ch 1, Turn, Sc in each St across.  = 79 Sc

Row 6:  Turn, Ch 3 (counts as Dc now and throughout), Sk 2 Sts, 5 Dc in next St(Shell made), Sk 2 Sts, *Sc in next St, Sk 2 Sts, Shell in next St, Sk 2 Sts*, Repeat * * 11 more times, Dc in last St. = 2 Dc, 13 Shells, 12 Sc

Rows 7-66: Repeat Rows 3-6 changing colors as indicated.

Row 67: Using the same color as the last row. Ch 2(counts as Hdc now and throughout), Hdc in next St, *Sc in next 3 Sts, Hdc in next 3 Sts*, Repeat * * across to the last 5 Sts, Sc in next 3 Sts, Hdc in last 2 Sts. = 40 Hdc, 39 Sc. Finish off.

Edging

Turn (Right Side Facing),  Join White with Sl St to the last Stitch of previous row.

Row 1:  Ch 1 Sc in 78 Sts across to last St, 3 Sc in last St(1st Corner), Working down the side of the rows Sc 94 Sts evenly to the last St, 3 Sc in next St,(2nd Corner), Sc in next 77 Sts, 3 Sc in next St(3rd Corner), Sc evenly 94 Sts up the last side to the beginning, 2 Sc in same as beginning Sc(4th Corner), Join with Sl St to beginning Sc. = 354 Sc

Row 2:  Ch 2(Counts as Hdc now and throughout), Turn, 3 Hdc in next St(1st Corner), Hdc in next 96 Sts, 3 Hdc in next St(2nd Corner), Hdc in next 79 Sts, 3 Hdc in next St(3rd Corner), Hdc in next 96 Sts, 3 Hdc in next St(4th Corner Made), Sc in last 78 Sts, Join to top of Ch 2. Finish. =  362 Hdc

Change to Aqua Yarn

Turn(Right Side Facing), Join with Sl St to top left corner St(middle St of the 3).

Row 3:  Ch 1, 3 Sc in same st(1st Corner), Sc in next 98 Sts, 3 Sc in next St(2nd Corner), Sc in next 81 Sts, 3 Sc in next St(3rd Corner), Sc in next 98 Sts, 3 Sc in next St(4th Corner), Sc in last 81 Sts, Join with Sl St to beginning. Finish off. = 370 Sc

Change back to White Yarn

Turn, Wrong Side Facing, Join with Sl St in top left corner St.

Row 4:  Ch 2, 2 Hdc in same St(1st Corner), Hdc in next 100 Sts, 3 Hdc in next St(2nd Corner), Hdc in next 83 Sts, 3 Hdc in next St(3rd Corner), Hdc in next 100 Sts, 3 Hdc in next St(4th Corner), Hdc in last 83 Sts, Join to top of Ch 2. =378 Hdc

Row 5: Ch 1, Turn, Sc in 85 Sts, 3 Sc in next St(1st Corner), Sc in next 102 Sts, 3 Sc in next St(2nd Corner), Sc in next 85 Sts, 3 Sc in next St(3rd Corner), Sc in next 102 Sts, 3 Sc in last St(4th Corner). Join with Sl St to beginning. = 386 Sc

Row 6: Rev Sc in each stitch around.

Finish off!

Congratulations, you now have a Summer Day’s Baby Blanket!!

Summer Day's Baby Blanket and Charlie

As usual… Here is Charlie with my latest project…. This photo bomb he is totally wiped out from working in the yard all day with me… and playing ball!

Happy Crocheting!!

Elena

*** Copy Right 2017 Beatrice Ryan Designs.  You may make and sell products from my patterns but if you do I ask that you link back to my post. Please do not copy and post these patterns in part or in full on any website or publication and/or claim it as your own. Please do not re-publish photos as your own.***

%d bloggers like this: