Disclaimer: This post includes affiliate links that I may get compensation from if you decide to make a purchase. Thank you for the support!
Happy National Dog Day…

Happy National Dog Day…

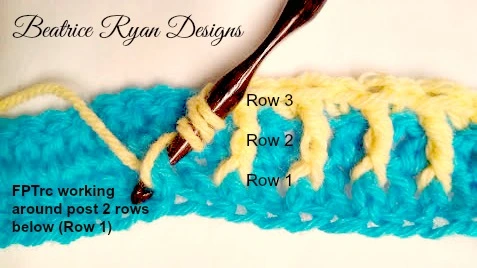
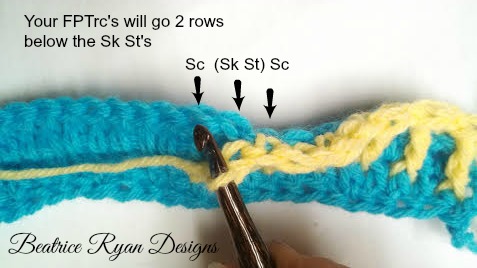
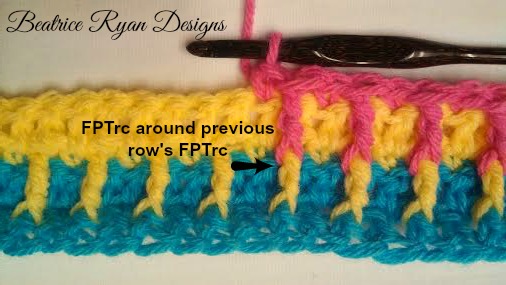
Today is National Dog Day. . If you have hung around  Beatrice Ryan Designs. .. You know how much Charlie loves to have his picture taken… He is modeling my latest free pattern. . Ombre Ridges Scarf.. Maybe he isn’t so excited about the modeling gig… but loves the camera!!!

Since it’s National Dog Day, it’s the perfect opportunity to celebrate our furry companions like Charlie, who is clearly a fan of the camera! If you’ve spent any time with Beatrice Ryan Designs, you already know how much Charlie loves to have his picture taken. He’s currently modeling the latest free pattern, the Ombre Ridges Scarf, showcasing not only his charm but also his love for the spotlight. While he might not be thrilled about the modeling gig, he certainly loves the camera!

Services like dog grooming training options in Kentucky can complement this by enhancing how Charlie and other dogs look and feel. Grooming training programs focus on teaching dogs to be comfortable with handling, brushing, and even posing for photos. This can make Charlie’s modeling experiences more enjoyable by ensuring he’s groomed and well-behaved, ready for the camera at a moment’s notice. Groomers in Kentucky offer specialized techniques that help dogs relax during their grooming sessions, making them more cooperative when it’s time to get dressed up or pose for pictures. By combining training with regular grooming, dog owners can ensure their pets feel confident and comfortable, allowing them to shine in every photo op, just like Charlie.

Happy National Dog Day with Charlie

My two favorite things. .. Crocheting and Charlie! !

Happy Crocheting!
Elena

Ombre Ridges Scarf… New Free Crochet Pattern!!

Ombre Ridges Scarf… New Free Crochet Pattern!!

Ombre Ridges Scarf


The simple and elegant style of this cozy crochet scarf will wrap you in warmth all winter long!!  This Free Crochet Pattern works up quickly using bulky yarn that has a self striping ombre effect and uses only one skein of yarn!!  A great back to school item and gift idea, you can start your winter projects early for those on your holiday list!!


Ombre Ridges Scarf

If you love this pattern, add it to your Ravelry Favorites… Click Here!!!


The Ombre Ridges Scarf measures approximately 5 1/2″ x 72″


Materials~

312 Yards of Bulky (5) Yarn – For the best results use 1 skein of  Lion Brand Yarns” Scarfie” Yarn!!  Pictured here in Cream/Black

Buy it now!!

*Scarfie Yarn comes in several colorways… JoAnn’s Fabrics is a great source Click Here for fantastic coupons!

K Hook
Scissors


Stitches~

Ch ~ Chain     St ~ Stitch     Sl St ~ Slip Stitch     Sk ~ Skip     Sc ~ Single Crochet     Dc ~ Double Crochet     Fptrc ~ Front Post Triple Crochet


Instructions~

Chain 16 loosely
Row 1:  Turn, sc in 2nd ch from hook and each st across. = 15 sc
Row 2:  Ch 3 (counts as dc now and throughout), turn, dc in each st across. = 15 dc
Row 3:   Turn, ch 1, sc in 1st dc, *fptrc in next stitch 2 rows below(Around the Sc of Row 1 directly below, see photo tutorial below), sk st (your fptrc is taking up this stitch below so you need to skip this stitch to avoid extra stitches),sc in next stitch( this will be in the typical stitch area)*. Repeat * * across to end.= 8 sc & 7 fptrc


Row 4:   Turn, ch 3, dc across. =  15 dc
Row 5:   Turn, ch 1 sc in 1st st, * fptrc around the previous rows fptrc (See Photo Tutorial), sk st, sc in next st*, Repeat * * across. = 8 sc & 7 fptrc


Row 6:   Turn, ch 3, dc across. = 15 Dc
Rows 7- 132: Repeat rows 5 & 6
Row 133: Ch 1, Turn Sc across. = 15 Sc
*Due to each skein of yarn varying slightly in length you may need to make stop at row 130 and then make row 131 the single crochet row. If you have extra yarn, feel free to make it longer!!
Finish off
Congratulations!! You have now completed your Ombre Ridges Scarf!!


Happy Crocheting!!
Elena

*** You may make and sell products from my patterns but if you do I ask that you link back to my post. Please do not copy and post these patterns and claim it as your own. Please do not re-publish photos as your own.***

*My site contains Affiliate Links, by clicking on the advertising I may be compensated*


Sands of Time Scarf…

Sands of Time Scarf…

Sands of Time Scarf,  I created this fun and easy to make crochet scarf!!!  Using self-striping yarn and working with an easy stitch pattern to achieve a rolling effect,,, The Sands of Time Scarf is elegant and  fashionable all year-long!!  It is light-weight enough for spring, but warm enough to keep you warm on a chilly winters day!!

Sands of Time Scarf

Sands of Time Scarf

If you love this scarf… You can add it to your Ravelry Favorites… Click Here!!

Materials:

Worsted Weight ~ Self-Striping Yarn 425 yards

Pictured above using Red Heart Unforgettable 1 1/2 skeins used
Buy it now!!

Hook ~ I

2 Large Beads (optional) for top of Tassle

Scissors

Stitches:

St ~ Stitch     Ch ~ Chain     Sc ~ Single Crochet     Hdc ~ Half Double Crochet

*Tips

You will be increasing  at one end of the scarf and Decreasing at the opposite end to get this fun bias roll effect.

To make this scarf wider, thinner, more or less bulky you can adjust your beginning chain to any width you desire

To make the scarf shorter or longer you can adjust the finished row amount

You will be working in Back Loops for every row

Measurement:

From tip to tip not including the tassels ~ length  85″  and the width when laid flat  7″

Instructions: 

Ch 46

Row 1: Sc in 2nd Ch from hook and each across. = 45 Sc

Work in Back Loops in every row

Row 2: Ch 2 (counts as Hdc now and throughout), Turn, Hdc in the same St as the beginning Ch(This will make an increase), Hdc in the next 43 Sts. Leaving the last St unworked(this will make the decrease. 45 Hdc

Row 3:  Turn, Sl St in first 2 Sts (Make sure to get the very 1st St, these 2 Sl Sts are the decrease), Ch 1, Sc in same St as 2nd Sl St, Sc in next 42 Sts, 2 Sc in the  last St (this will be in the top of the Ch 2 from the prev row, this is an increase). = 45 Sc

Continue working Rows 2 &  3 until your scarf reaches the desired length. I did a total of 117 rows and ended with a Sc row.  Finish off.

Add a tassel to each end if desired.

Here is a quick tutorial on How to Make a Tassel out of yarn…  Tassel Making

I added a fun bead to the top of my tassel for fun!

Tassel

And of course… Charlie wouldn’t miss his chance to get in on the action while I was doing the photo shoot… He loves a celebration and  pictures..

Charlie and Sands of Time

FacebookInstagramMy CAL Facebook Group, and Pinterest

I hope you love this project!!  Finally, make sure to share your finished projects on my Beatrice Ryan Designs Facebook Page and make sure to share around social media too! Why share?? Because it shares our Love of Crochet!!

Until we meet again, Happy Crocheting!!!

Elena


©Copyright 2025 Elena Hunt/Beatrice Ryan Designs.  All of my patterns and posts are my own work. Do not copy them in any way. If you want to share this information with someone, share the link to this post. Additionally, If you want to share on your own blog, website or social media, then you may use the first photo in this post and link back to this post. You may not give away printed copies of this post. Thank you. This post may contain affiliate link