Disclaimer: This post includes affiliate links that I may get compensation from if you decide to make a purchase. Thank you for the support!
Eye Of The Storm Afghan CAL Week 1

Eye Of The Storm Afghan CAL Week 1

Welcome to the first week of this fun and whimsical Eye Of The Storm Afghan Crochet Along! Each week we will make either 1 or 2 of the 12″ squares(depending on the size of afghan you prefer). And in 14 weeks you will have a beautiful Eye of the Storm Afghan!!!


Week 1’s Squares

Here is a list of what you will see in this first week’s post

**Please read through completely, this has all the info you need*

  • How the CAL(Crochet Along) works
  • Where you can find the information post for this CAL
  • How to get all my new posts delivered to your email
  • The CAL Schedule
  • How to choose your colors
  • How much yarn will we need
  • Unboxing of my yarn and where you can get the same yarn
  • What size afghan you can make
  • How you can get the Eye Of The Storm Pattern
  • How and why to block your squares
  • Where you can participate in the group setting
  • Prizes during this CAL
  • Tips

How the CAL Works

The Eye Of The Storm Afghan CAL is a total of 15 weeks which includes the final fan gallery and Grand Prize announcement. Each week on Saturday I will post my latest progress, any new details and all the details you will need.

We will make 1 or 2 blocks per week depending on the size of afghan you would like to make. After all you blocks are complete, we will join and do a border.

There is no signing up or expectations. Just make your squares(even if they at your own pace) and have fun!

Where to find the information post

To see more details on the CAL and all the information in that post, Click Here

The information post and all the weekly CAL posts are also available in the Crochet with Me Crochet Along tab at the top of the page

How to receive new posts by email

If you would like to receive the latest posts in your email, fill out the “Stay Connected” box in the right side at the top of this website…

The Schedule

  • Week 1 – Saturday August 1: 1 or 2 squares
  • Week 2 – Saturday August 8: 1 or 2 squares
  • Week 3 – Saturday August 15: 1 or 2 squares
  • Week 4- Saturday August 22: 1 or 2 squares
  • Week 5 – Saturday August 29: 1 or 2 squares
  • Week 6 – Saturday September 5: 1 or 2 squares
  • Week 7 – Saturday September 12: 1 or 2 squares
  • Week 8 – Saturday September 19: 1 or 2 squares
  • Week 9 – Saturday September 29: 1 or 2 squares
  • Week 10 – Saturday October 3: 1 or 2 squares
  • Week 11 – Saturday October 10: 1 or 2 squares
  • Week 12 – Saturday October 17: 1 or 2 squares
  • Week 13 – Saturday October 25: Join Squares
  • Week 14 – Saturday October 31: Border
  • Week 15- Saturday November 14.. Finale of fan project post and Grand Prize winner announcement

How To Choose Colors

You will need a minimum of 6 colors to make the Eye of the Storm Square as designed. You can make it a scrap buster, coordinate your color scheme or make it a whimsical chaos style.

I have chosen to make mine in the whimsical chaos style! What is that? I purchased yarn kits with 12 colors of Red Heart Super Saver that all go together on Amazon. I made a small card for each color(see my pics) and for each square I am randomly drawing 6 cards. I make the square in the order of how I pulled the card for A, B, C, D, E and F colors.

Yarn

So I purchased 4 of these Red Heart Super Saver Kits with 12 colors and a total per kit of 1116 yards. That is 4464 yards total to make the large size afghan.(these are small skeins). To see these on Amazon or purchase yours, Click here

Week 1's yarn

Pictured above are week 1’s yarn colors and the cards for the chaos style I pulled for each square and below are how the squares turned out! I Love Mine! What do you think?


My yarn arrived
Yay I got all my yarn!!!

How Much Yarn Will We Need?

Each block will take approximately 25 yards of each color in the block. You will use 6 colors per block. That will be 150 yards per block total. Depending on the size of you afghan and how many blocks you choose to make will determine your total yardage. You will also need joining and border yarn.

I am using 12 colors, but only 6 per block. I will be making 24 blocks for the large afghan 4 blocks across and 6 blocks down. I have well over 4000 total yards from the kits… This should be enough for me.

If you do 6 colors and the large afghan you will need approximately 600 yards of each color then 300- 400 yards to join/border. That should be a total amount of yardage of 4000 approximately.

*We Use a J hook for this project.

Unboxing My Yarn

What Size Afghan Can I Make

Each block is approximately 12″ x 12″. Then there is joining allowance and the border. The border will be approximately 6 total inches and joining is just a couple of extra inches.

Blocks

  • 3 x 4 (12 blocks) Afghan 44″ x 56″ Make 1 Block Per Week
  • 3 x 5 (15 blocks) Afghan 44″ x 68″ Make 2 Blocks This Week
  • 4 x 5 (20 blocks) Afghan 56″ x 68″ Make 2 Blocks This Week
  • 4 x 6 (24 blocks) Afghan 56″ x 80″ Make 2 Blocks This Week

The Eye Of The Storm Pattern

You can come directly to my website for the FREE Pattern which is a separate post, ***Click here for the Eye of the Storm Square Free Pattern Post***

It is the same pattern each week, just 2 different colorways each week. Or you can purchase the PDF version for $5 USD on Ravelry.

How and Why We Block These Squares

Due to the nature of this square… They are a bit wonky when made. So we need to block them to get them to lay flat and get to be the right size. you can steam block them into shape, just be careful not to damage the yarn, you can wet block… Get them wet and get them into shape or use a blocking mat and pins(that is what I prefer). I got mine wet with warm water, rolled them in a towel to get the extra water out then put them on my blocking mat and pinned them into place… I used alot of pins, I wanted them to be shaped in the triangle part and the outer area too.

***Please note. Mine turned out 14″. That is ok for me. If yours are to big, you can leave out the last round of Vsts!!!

Blocking your squares

Where You Can Participate

Please share you project on social media… Spread the Love Of Crochet! If you would like to participate in my Beatrice Ryan Designs CAL Group of Facebook, You can join here! We share progress photos, help with questions, and there are prizes during each CAL.

Now, Let’s talk prizes!!!

As mentioned before… Fun prizes are given away in the Facebook CAL Group throughout the CAL… But – There is a GRAND PRIZE at the end of the CAL for those who finish the blanket by the designated time! It’s a $50 Amazon Gift Card!!! Perfect timing for Christmas shopping! See all the rules below!

More about the weekly prize drawings and Grand Prize:

Grand Prize – There will be a $50 Amazon Gift Card for 1 lucky winner at the end of the CAL. The grand prize will be drawn on Wednesday November 11th 2026 . To be eligible, you must email a picture and permission by 11:59pm pst on Tuesday November 10th 2026 to [email protected] showing your completed project. Entries will be numbered by the order they arrive and the number will be drawn using a random number generator. The winner will be announced on November 14th 2026 in the final post!

Tips

Be patient – If the pattern is confusing, re read it… It works. – After you make your first block, you will fly through the rest!

That’s it… Now make your squares… Grab your yarn and hooks and meet me back here each Saturday now thru November!


And, Don’t forget to follow me on my social media sites for more fun! And, most important you share your creations

FacebookInstagramMy CAL Facebook Group, and Pinterest

I hope you love this project!!  Finally, make sure to share your finished projects on my Beatrice Ryan Designs Facebook Page and make sure to share around social media too! Why share?? Because it shares our Love of Crochet!!

Until we meet again, Happy Crocheting!!!

Elena


©Copyright 2026 Elena Hunt/Beatrice Ryan Designs.  All of my patterns and posts are my own work. Do not copy them in any way. If you want to share this information with someone, share the link to this post. Additionally, If you want to share on your own blog, website or social media, then you may use the first photo in this post and link back to this post. You may not give away printed copies of this post. Thank you. This post may contain affiliate link

Amazing Grace Bucket Hat

Amazing Grace Bucket Hat

Amazing Grace Bucket Hat! The perfect Summertime hat… And, This is the 29th Amazing Grace Pattern! All of the Amazing Grace Crochet Patterns are dedicated to Breast Cancer Awareness. Read more about this in the Amazing Grace Pattern tab at the top of the page!

Amazing Grace Bucket Hat

Crocheted Bucket Hats seem to be the thing this year and I was so excited to combine this style hat with the special stitch that I use in all of my Amazing Grace Crochet Patterns…

This is a two row repeat for the special Amazing Grace Stitch, one row has (sc,ch2,sc) I say this is catching the prayers for the next row that represents the prayer for those who we give these to. The second row of the special Amazing Grace Stitch is 3 dc in the ch 2 of the previous row. If you believe in the Father, Son and Holy Spirit, this is what I pray in the 3dc sts for the ones who are suffering from cancer or any life altering event. This hat only has one set of the Amazing Grace Stitch Pattern for sun protection!

The hat uses cotton yarn and is so soft! This makes a great light weight hat for someone who may have lost their hair! Make on to give or just for your self!

Bucket Hat, Amazing Grace

Materials

Yarn – 180 yards of cotton yarn. I used Walmarts brand, Mainstay Cotton Yarn. One hat is in Brownstone and the other is in Daylily Pink

Hook – I

Scissors, Yarn needle and Place Markers

This hat fits an average size womens head, make sure you check your gauge to get it to work correctly. Additionally, yarn will change the way the hat works up… So, if you need it larger or smaller the crown of the hat is in increments of 3.

Also, the pattern is written in US terms.

Stitches

  • St – Stitch
  • Ch – Chain
  • Sk – Skip
  • Sl St – Slip Stitch
  • Sc – Single Crochet
  • Blsc – Back Loop Sc
  • Dec – Decrease (work 1 st over 2 sts to decrease)
  • Inc – Increase (work 2 sts in indicated st)
  • PM – Place Marker
  • FO – Finish Off

Gauge

2″ x 2″ = 9 rows x 8 sc sts

Instructions

Crown of Hat

Ch 75, join with sl st to form ring(make sure not to twist the chain while joining)

Round 1: Ch 1, sc in each st around, join with sl st. = 75 sc *Tip – Make sure this row fits comfortably around your head, if not go up/down a hook size

Rounds 2-6: Ch 1, blsc in each st around, pm in 1st st! You will work in continuous rounds and not joining. Move marker at each row completion. = 75 blsc for each round

Round 7: *(sc,ch2,sc) in next st, sk 2 sts*, repeat *to* around and join beginning sc. = 25 (sc,ch2,sc)

Round 8: Sl St in next ch 2 sp, ch 3(counts as dc now and throughout), 2 dc in same sp, 3 dc in each ch 2 sp around, join with sl st to top of beginng ch 3. = 25 3dc groups

Round 9: Ch 1, blsc in each st around, do not join, you will start continuous rounds again. = 75 blsc

Rounds 10-16: Sc in each st around in continuous rounds, pm in 1st st and move it each round to keep track= 75 sc in each round

Round 17: Ch 1, *blsc in each st around, join with sl st to beginning sc. = 75 blsc

Top of Hat

Round 18: Ch 1, sc in 5 sts, dec, *sc in next 10 sts, dec*, repeat *to* 5 more times, sc in next 5 sts, dec, sc in last st, join with sl st to beginning sc. = 68 sc

Round 19: Ch 1, sc in 3 sts, dec, *sc in next 9 sts, dec*, repeat *to* 4 more times, sc in last 8 sts, join with sl st to beginning sc. = 62 sc

Round 20: Ch 1, Sc in 5 sts, dec,*sc in next 8 sts, dec*, repeat *to* 4 more times, sc in last 5 sts, join with sl st. = 56 sc

Round 21: Ch 1, sc in 4 sts, dec, * sc in next 7 sts, dec*, repeat *to* 4 more times, sc in last 5sts, join with sl st. = 50 sc

Round 22: Ch 1, sc in 4 sts, dec, *sc in next 6 sts, dec*, repeat *to* 4 more times, sc in last 4 sts, join with sl st. = 44 sc

Round 23: Ch 1 sc in 2 sts, dec, *sc in next 5 sts, dec*, repeat *to* 4 more times, sc in last 5 sts, join with sl st. = 38 sc

Round 24: Ch 1, sc in 1 st, dec, * sc in next 4 sts, dec*, repeat *to* 4 more times, sc in last 5 sts, join with sl st. =32 sc

Round 25: Ch 1, sc in 1 st, dec, *sc in next 3 sts, dec*, repeat *to* 4 more times, sc in last 4 sts, join with sl st. = 26 sc

Round 26: Ch 1, *sc in 2 sts, dec*, repeat *to* around, sc in last 2 sts, join with sl st. = 20 sc

Round 27: Ch 1, *sc, dec* repeat *to* around, join with sl st.= 14 sc

Round 28: Ch 1, dec around, join with sl st. = 7 sc

FO, leave a long tail, with yarn needle, weave the tail through each of the 7 sts and draw closed, secure and weave in the ends.

Brim

With right side facing, join yarn in any st of round 1. You will be working in the sts of round 1 of the crown

Round 1: Ch 1, sc in each st around, pm in 1st st, you now will work in continuous rounds, = 75 st

Round 2: *Sc in next 6 sts, inc* repeat around 9 more times, sc in 4 sts, inc. = 86 sts

Round 3: Sc around. = 86 sts

Round 4: Sc in 3 sts, inc, *sc in next 6 sts, inc*, repeat *to* 10 more times, sc in last 5 sts. = 98 sc

Round 5: Sc around. = 98 sts

Round 6: Inc, *sc in next 6 sts, inc*, repeat *to* 12 more times, sc in last 6 st. = 112 sc

Round 7: Sc around. = 112 sc

Round 8: Sl st in each st around(not to tightly), join. = 112 sl sts

FO, Weave in tail with yarn needle. Lightly stretch the hat, steam if needed to get shaping and fit!

Finally, now you have an Amazing Grace Bucket Hat!!! I hope you love it, I love mine!

To receive all of my new posts by email, fill out the “STAY CONNECTED” box in the top right side of this website. You will get the email the minute I post something new!!


Also, Don’t forget to follow me on my social media sites for more fun!

FacebookInstagramMy CAL Facebook Group, and Pinterest

Finally, make sure to share your finished projects on my Beatrice Ryan Designs Facebook Page and make sure to share around social media too! Why share?? Because it shares our Love of Crochet!!

Happy Crocheting!!

Elena

©Copyright 2026 Elena Hunt/Beatrice Ryan Designs.  All of my patterns and posts are my own work. Do not copy them in any way.

Additionally, If you want to share this information with someone, share the link to this post. If you want to share on your own blog, website or social media, then you may use the first photo in this post and link back to this post. You may not give away printed copies of this post. Thank you. This post may contain affiliate link

Blue Sunday Shawl

Blue Sunday Shawl

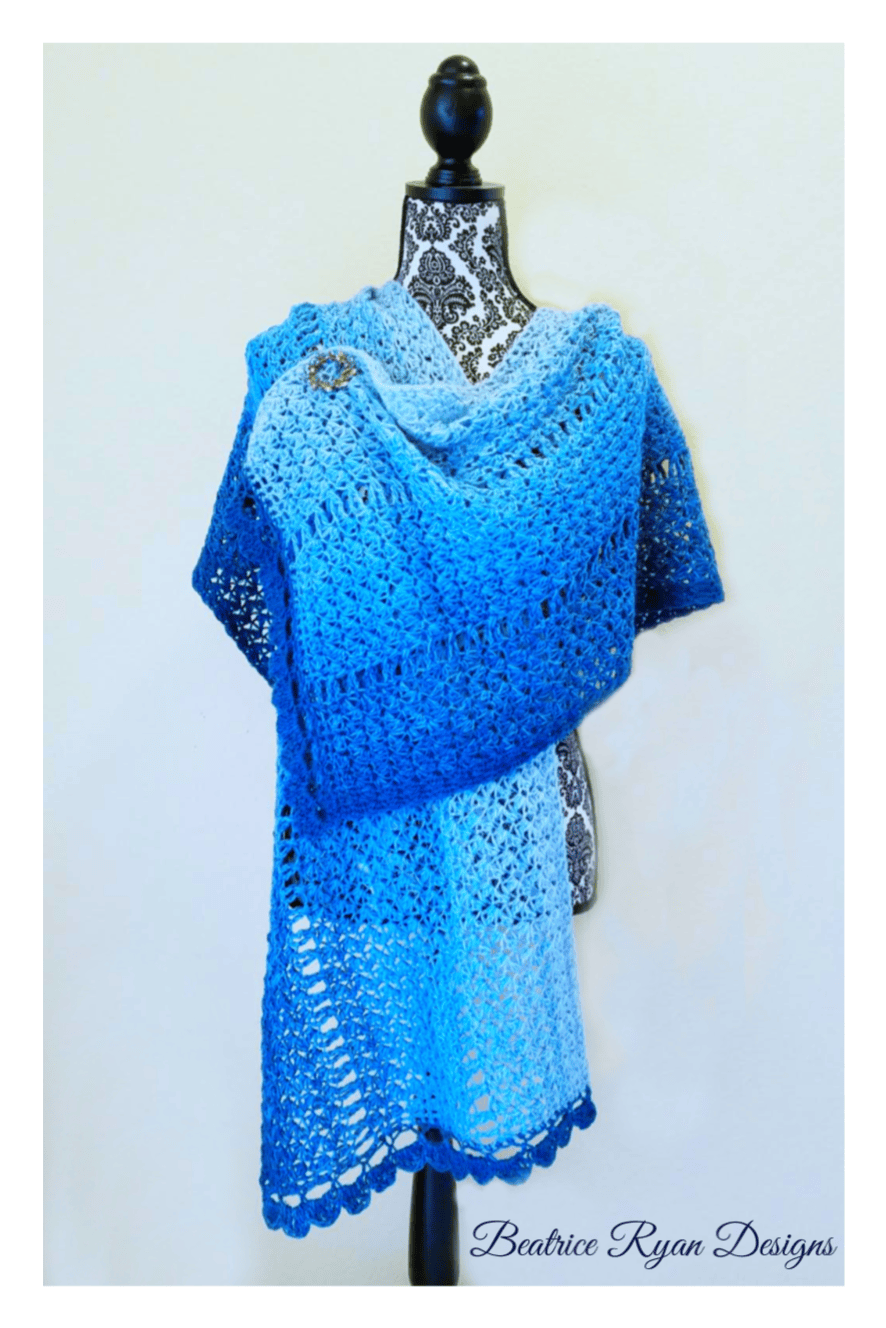
Blue Sunday Shawl is a Free Crochet Pattern that is easy to make and so fashionable to wear! Simple stitching, easy row repeats for the base and a simple, but cute edging!!!

Blue Sunday Shawl

And, You can add this to your Ravelry Favorites for easy access! Also available in a PDF Paid format on Ravelry or Etsy for $5.00 USD

Materials:

Yarn – Loops & Threads (#3 weight) Luxe Merino Wool Blend Yarn in Chalk Blue 410 yds/skein – 4 skeins needed for a total of 1640 yards. This is a Michaels Craft Store Yarn… (if you choose different yarn you will have a different size result)

Hook – G

Scissors and Yarn Needle

Stitches:

  • Ch – Chain
  • St – Stitch
  • Sp – Space
  • Sl St – Slip Stitch
  • Sc – Single Crochet
  • Foundation Sc – Foundation Single Crochet
  • Dc – Double Crochet
  • V St – V Stitch (dc,ch1,dc) in designated st
  • FO – Finish Off

Size:

32″ x 75″ when blocked

Tips:

  • Pattern is written in US Terms
  • Check your stitch count occasionally

Instructions:

Row 1: 120 Foundation Sc or Ch 121, turn, sc in 2nd ch from hook and each across = 120 sc

Row 2: Ch 3(counts as dc now and throughout), turn, dc in each st across. = 120 dc

Row 3: Ch 3, turn, dc in next 59 sts, (dc,ch1,dc) in next st, * ch 2, sk 5 sts, 4 dc in next st, ch 2, dc in next st*, repeat *to* 6 more times, ch 2, sk 5 sts, 4 dc in next st, dc in last 4 sts. = 15 ch 2, 105 dc & 1 ch 1

Row 4: Ch 3, turn, dc in next 3 sts, (dc,ch1,dc) in next st, ch 2, sk 3 sts, sk ch 2sp, sk dc, *(4dc,ch2,dc) in next ch 2sp, ch 2, sk 4 sts, sk ch2 sp, sk dc*, repeat *to* 6 more times, 4 dc in last ch 2sp, sk next st, dc in next 60 sts. = 105 dc, 1 ch 1 sp, 15 ch 2 sps

Row 5: Ch 3, turn, dc in next 59 sts, (dc,ch1,dc) in next st, ch 2, sk 3 sts, sk ch 2sp, sk dc, *(4dc,ch2,dc) in next ch 2sp, ch 2, sk 4 sts, sk ch2 sp, sk dc*, repeat *to* 6 more times, 4 dc in last ch 2sp, sk next st, dc in last 4 sts. = 105 dc, 1 ch 1 sp, 15 ch 2 sps

Rows 6 – 55: Repeat rows 4 & 5

*You will now be making the lace over the dc area and the dc over the lace area

Row 56: Ch 3, turn, making the next 60 dc over the lace area, dc in each st, 1 dc in each ch 2sp, sk last ch 1 sp and dc in last st of lace area for a total of 60, you should now have 60 unworked dc to work your lace area over, (dc,ch1,dc) in next st, *ch2, sk 5 sts, 4 dc in next st, ch 2, dc in next st*, repeat *to* 6 more times, ch 2, sk 5 sts, 4 dc in next st, dc in last 4 sts. = 15 ch2 sps, 105 dc & 1 ch1 sp

Row 57: Ch 3, turn, dc in next 3 sts, *(dc,ch1,dc) in next st, ch 2, (4dc,ch2,dc)in next ch2 sp, ch 2*, repeat *to* 6 more times, 4 dc in next ch 1 sp, sk st, dc in next 60 sts. = 105 dc, 1 ch1 sp & 15 ch2 sps

Row 58: Ch 3, turn, dc in next 59 sts *(dc,ch1,dc) in next st, ch2, (4dc,ch2,dc) in next ch 2 sp, ch 2*, repeat *to* 6 more times, 4 dc in next ch1 sp, dc in last 4 sts. = 105 dc, 1 ch1 sp * 15 ch2 sps

Rows 59-109: Repeat rows 57 & 58

Row 110: Ch 3, turn, making the next 60 dc over the lace area, dc in each st, 1 dc in each ch 2sp, sk last ch 1 sp and dc in last st of lace area for a total of 60, dc in remaining 60 sts. = 120 dc

Row 111: Ch 1, turn, sc in each st across. = 120 sc

Edging

edge

Row 112: Ch 3, turn, sk next st, *v st in next st, sk 2 sts*, repeat *to* across, dc in last st. = 2 dc & 39 v sts

Rows 113-118: Ch 3, turn, v st in each v st across, dc in last st. = 2 dc & 39 v sts

Row 119: Ch 1, turn, sc in 1st st, ch 3, sc in next v st, *ch 4, sc in next v st*, repeat *to* across to last v st, ch 3, sc in last st. = 2 ch3, 38 ch4 & 41 sc

Row 120: Ch 1, turn, sc in 1st st, *ch 5, sl st in 2nd ch from hook, ch 2, sc in next ch4 sp*(chain picot made), repeat *to* across ending in the last st. = 39 chain picots

Finish off

Edging on opposite end

Rows 121 – 129: Join yarn in 1st st, repeat rows 112-120

Finish off and block

That’s it… You now have a Blue Sunday Shawl!!! I hope you enjoy yours!

Also, Don’t forget to follow me on my social media sites for more fun!

FacebookInstagramMy CAL Facebook Group, and Pinterest

Finally, make sure to share your finished projects on my Beatrice Ryan Designs Facebook Page and make sure to share around social media too! Why share?? Because it shares our Love of Crochet!!

Happy Crocheting!!

Elena


In a hurry to get ready??? I love these Messy Bun Hair Extensions!!! They give me the look I love and I am out the door in minutes… Currently $27.99 on Amazon! Click here to get yours!


©Copyright 2026 Elena Hunt/Beatrice Ryan Designs.  All of my patterns and posts are my own work. Do not copy them in any way.

Additionally

If you want to share this information with someone, share the link to this post. Additionally, If you want to share on your own blog, website or social media, then you may use the first photo in this post and link back to this post. You may not give away printed copies of this post. Thank you. This post may contain affiliate link