

Beatrice Ryan Designs Crochet-A-Long Afghan… Week 3
February 1, 2014 By Leave a Comment
I know I am having a great time seeing all the great CAL projects coming to life… Our Facebook “Show and Tell” has been a blast…Thank you all for posting your projects! Week 1 & Week 2 are now complete,,, We have 8 Granny Squares joined together and the first 2 rows completed around!!! Now to some fun stitching…
This week we will continue to work around our afghan with some fun textural stitching… Don’t worry… The next few rows are easy and I have some pictures for you to guide you!!!! And, I will be asking you to count your stitches at the end of your rows… This will be very important to keep your afghan in a nice even rectangular shape!!!
Week 3 CAL Instructions:
Stitches:
Sl St – Slip Stitch Ch – Chain Hdc – Half Double Crochet Trc – Triple Crochet
Twisted Stitch – This is a combination of 2 Trc crossed over each other. See Picture 2 for tutorial
*Tip: It will be very important to count your stitches and write down how many you have top, bottom and both sides. You should have the same “even” number of stitches on the top and bottom… and the same “even” number of stitches on the Right and Left sides.
*Tip: When working on Row 3 using the Twisted Stitches, make sure you are using all the stitches by double checking your stitch count. So if you have 94 Hdc stitches on the top from row 2,,, You will have 47 Twisted Stitch Sets or 94 Trc that cross over each other in pairs. See picture below.
Using one of your non neutral yarn colors, Join with Sl St to any “even” stitch from row 2 (See Picture 1)

Row 3: Ch 4(Counts as Trc now and throughout), Trc in Previous stitch to create a Twisted Stitch Pair.( See Picture 2).* Skip next stitch, Trc in next stitch, Trc in Previous stitch(skipped stitch) to form Twisted Stitch Pair. Repeat Twisted Stitch Pairs across to corner. 5 Trc in corner space*. Repeat * * around to past last corner. Continue with Twisted Stitch Pairs until you reach the beginning Twisted Stitch Pair. Join to top of Ch 4. Finish off.
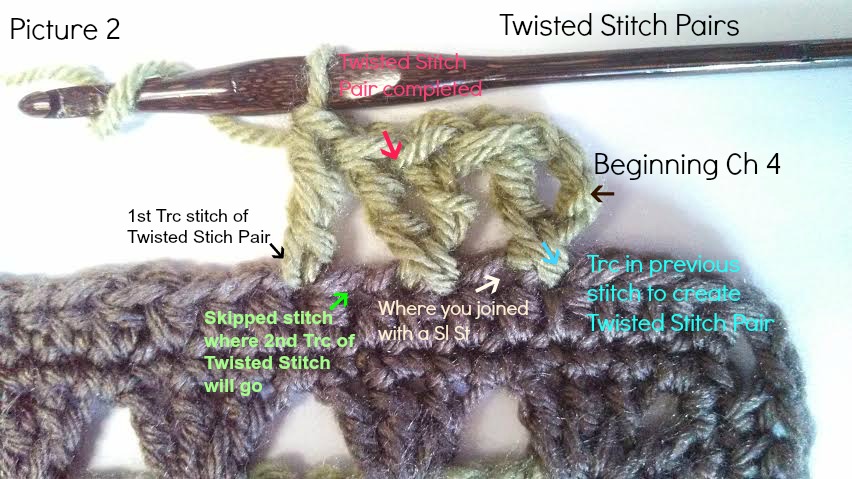
Twisted Stitch Pair Photo Tutorial
.

Photo of Row 3 Corner
.
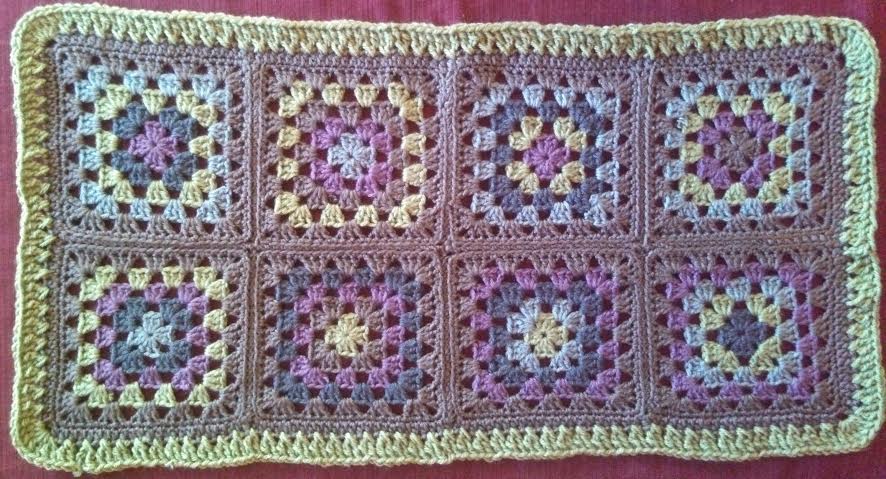
Photo of Afghan with Row 3 Complete
.
Row 4: With Neutral Color join with Sl St in any stitch. Ch 2 (Counts as Hdc), Hdc in each stitch around, Making 3 Hdc’s in the center stitch of each corner, (this will be in the 3rd Trc stitch in the previous round). Join with Sl St to Ch 2 and finish off. * Make sure your stitch count has the same number of stitches on the top/bottom and also the same number of stitches on the right/left. This will be important to keep the afghan in an even rectangle.
Row 5: Change yarn colors to any Non-Neutral Color and join with Sl St to an “even” numbered stitch (Same as row 3). Ch 4(Counts as Trc now and throughout), Trc in Previous stitch to create a Twisted Stitch Pair.( See Picture 2).* Skip next stitch, Trc in next stitch, Trc in Previous stitch(skipped stitch) to form Twisted Stitch Pair. Repeat Twisted Stitch Pairs across to corner. 3 Trc in corner space(this will be in the 2nd Hdc corner stitch from row 4)*. Repeat * * around to past last corner. Continue with Twisted Stitch Pairs until you reach the beginning Twisted Stitch Pair. Join to top of Ch 4. Finish off. *This round you should have 3 more Twisted Stitch Pairs on each side of your afghan from your previous count in row 3. (For example: I had 47 Twisted Stitch Pairs on the top and bottom when I completed row 3, Now, for row 5-I have 50 Twisted Stitch Pairs and on the right/left sides I had 22 Twisted Stitch Pairs when row 3 was complete and now have 25 Pairs for row 5.)
Row 6: With Neutral Color, Join with Sl St to any stitch. Ch 2 (Counts as Hdc),* Hdc across to corner stitch (This will be the 2nd Trc in corner from Row 5), 3 Hdc in corner St*. Repeat* * around to beginning Ch2. Join with Sl St to Ch 2. finish off.
.
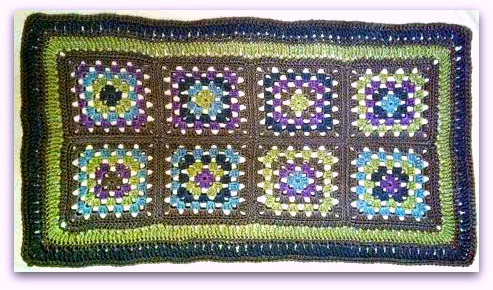
Week 3 progress Picture
.

Week 3 Progress-Corner
.
You now have completed Week 3… Congratulations!!!! I hope you love your afghan to this point… Next week we will be using some new stitches and having some more fun!!
Happy Crocheting…
Elena
.

