Disclaimer: This post includes affiliate links that I may get compensation from if you decide to make a purchase. Thank you for the support!

Beatrice Ryan Designs Crochet-A-Long Afghan… Week 3

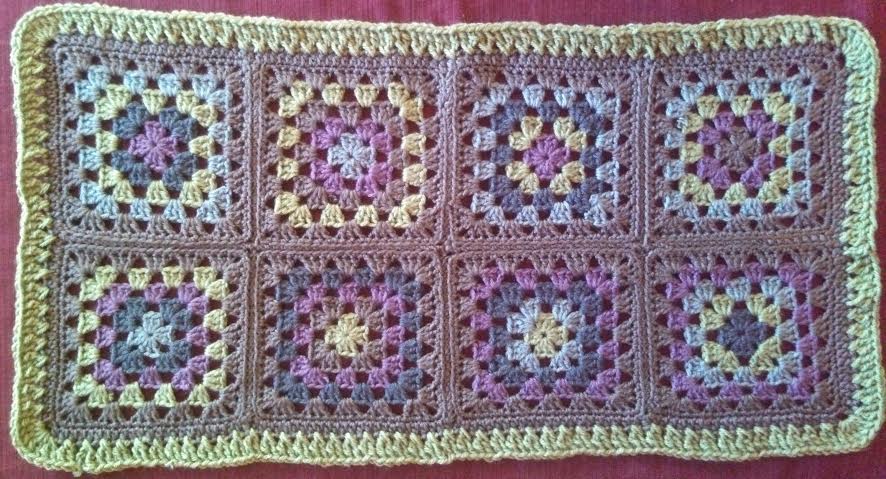
I know I am having a great time seeing all the great CAL projects coming to life… Our Facebook “Show and Tell” has been a blast…Thank you all for posting your projects!  Week 1 & Week 2 are now complete,,, We have 8 Granny Squares joined together and the first 2 rows completed around!!! Now to some fun stitching…

This week we will continue to work around our afghan with some fun textural stitching… Don’t worry… The next few rows are easy and I have some pictures for you to guide you!!!!  And, I will be asking you to count your stitches at the end of your rows… This will be very important to keep your afghan in a nice even rectangular shape!!!

Week 3 CAL Instructions:

Stitches:

Sl St – Slip Stitch     Ch – Chain     Hdc – Half Double Crochet     Trc – Triple Crochet

Twisted Stitch – This is a combination of 2 Trc crossed over each other.  See Picture 2 for tutorial

*Tip:   It will be very important to count your stitches and write down how many you have top, bottom and both sides.  You should have the same “even” number of stitches on the top and bottom… and the same “even” number of stitches on the Right and Left sides.

*Tip:  When working on Row 3 using the Twisted Stitches, make sure you are using all the stitches by double checking your stitch  count.  So if you have 94 Hdc stitches on the top from row 2,,, You will have 47 Twisted Stitch Sets or 94 Trc that cross over each other in pairs.  See picture below.

Using one of your non neutral yarn colors, Join with Sl St to any “even” stitch from row 2 (See Picture 1)
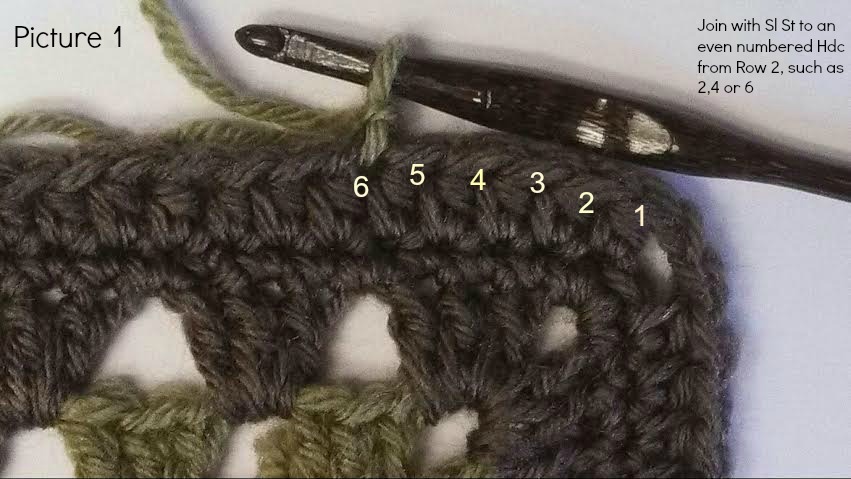
6

Row 3:     Ch 4(Counts as Trc now and throughout), Trc in Previous stitch to create a Twisted Stitch Pair.( See Picture 2).* Skip next stitch, Trc in next stitch, Trc in Previous stitch(skipped stitch) to form Twisted Stitch Pair.  Repeat Twisted Stitch Pairs across to corner. 5 Trc in corner space*. Repeat * * around to past last corner. Continue with  Twisted Stitch Pairs until you reach the beginning Twisted Stitch Pair. Join to top of Ch 4. Finish off.
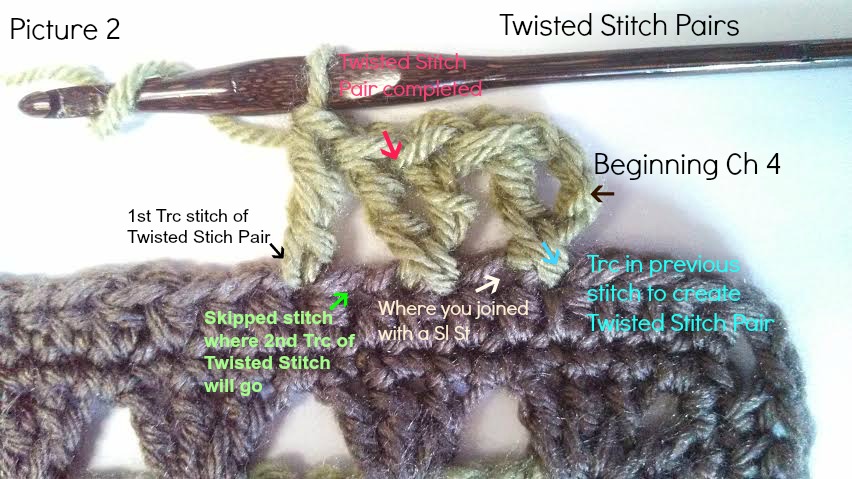
Twisted Stitch

Twisted Stitch Pair Photo Tutorial

.

2

Photo of  Row 3 Corner

.

1

Photo of Afghan with Row 3 Complete

.

Row 4:   With Neutral Color join with Sl St in any stitch.  Ch 2 (Counts as Hdc), Hdc in each stitch around, Making 3 Hdc’s in the center stitch of each corner, (this will be in the 3rd Trc stitch in the previous round). Join with Sl St to Ch 2 and finish off.  * Make sure your stitch count has the same number of stitches on the top/bottom and also the same number of stitches on the right/left. This will be important to keep the afghan in an even rectangle.

Row 5:   Change yarn colors to any Non-Neutral Color and join with Sl St to an “even” numbered stitch (Same as row 3).  Ch 4(Counts as Trc now and throughout), Trc in Previous stitch to create a Twisted Stitch Pair.( See Picture 2).* Skip next stitch, Trc in next stitch, Trc in Previous stitch(skipped stitch) to form Twisted Stitch Pair.  Repeat Twisted Stitch Pairs across to corner. 3 Trc in corner space(this will be in the 2nd Hdc corner stitch from row 4)*. Repeat * * around to past last corner. Continue with  Twisted Stitch Pairs until you reach the beginning Twisted Stitch Pair. Join to top of Ch 4. Finish off.  *This round you should have 3 more Twisted Stitch Pairs on each side of your afghan from your previous count in row 3.   (For example: I had 47 Twisted Stitch Pairs on the top and bottom when I completed row 3, Now, for row 5-I have 50 Twisted Stitch Pairs and on the right/left sides I had 22 Twisted Stitch Pairs when row 3 was complete and now have 25 Pairs for row 5.)

Row 6: With Neutral Color, Join with Sl St to any stitch.  Ch 2 (Counts as Hdc),* Hdc across to corner stitch (This will be the 2nd Trc in corner from Row 5), 3 Hdc in corner St*.  Repeat* * around to beginning Ch2. Join with Sl St to Ch 2. finish off.

.
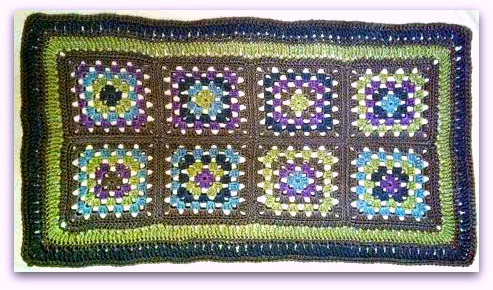
Week 3

Week 3 progress Picture

.

Wk 3 corner

Week 3 Progress-Corner

.

You now have completed Week 3… Congratulations!!!!  I hope you love your afghan to this point… Next week we will be using some new stitches and having some more fun!!

Happy Crocheting…

Elena

.

Wednesday Facebook Fan Favorite…Week 24

Have you ever thought of your crochet season??  That’s when you tend to crochet more… mine is September-April… That’s not saying I don’t crochet the rest of the year… But, those colder months I have some sort of desire to work on things that keep me warm!!  I can see that in our Facebook Fan Favorite Series...  Each week over the last few months, there has been way more of you talking about and sharing these Daily Free Pattern finds…   This weeks winner had almost 2000 comments, likes and views all on its own… And many of the other weekly finds had close to the same!!  So here is the weekly Facebook Fan Favorite…

.

1000450_581047565316725_959980310_n

Patchwork Purse by Patons

.

Patchwork seems to be a hot trend this winter and if you are a bag/purse collector this stylish  design may be just right for you!

If you are new to our Facebook segment,,,  Each day I present a Daily Free Pattern Find that I have found while browsing the internet…  The winner is selected by your views, comments, likes and shares!  Also, Past segments (and there are tons of Free Patterns) are stored in my Facebook Photo Library…  There are now 2 Photo Albums for this series,,, One album for 2013 Free Pattern Finds and a new 2014 Album…

CAL News:

We are having so much fun working on our Crochet-A-Long!!!!  Last Friday on our Facebook “Show and Tell”, There were so many beautiful pictures posted…  I have had a sneak peek already of a few week two projects… love them!!!  It isn’t to late to join in the fun,,, Week 1 and 2 pattern sections are posted in the Crochet-a-Long tab at the top of the page and are easily completed…

Also you can follow along with the other 118 members over on Ravelry… And we have our own Pinterest Page just for our CAL progress pictures… Hop over and check all the great pictures out!!!  If you would like to post your CAL pictures on the pinterest page,,, Just shoot me an email to [email protected] and I will have an invite sent by Pinterest for you to join in…

How is your CAL afghan coming along??  Mine is lovely so far… and I think you are going to LOVE week 3 pattern section!!!

Happy Crocheting…

Elena

Beatrice Ryan Designs Crochet A Long Afghan.. Week 2

I hope you had a great week and had fun crocheting your Granny Squares…  Are you ready to put them together and move on to the next step??

There are two methods frequently used to join Granny Squares… You can whip stitch them together or crochet them together… Since I am a total crochet-a-holic and not so much a seamstress… I always have crocheted mine together… But if you prefer the look of the stitching method that will be great too… I found 2 great tutorials for these methods incase you haven’t joined Granny Squares together before…

.
The first method is Crocheting Granny Squares together. This tutorial is by one of my favorite Crochet Artists… Lucy from Attic 24… She is famous for her colorful Granny Squares and this tutorial is very clear and it will walk you through this method if this is the one you  would like to use!!!  Click Here for the Crocheting Granny Squares Together Method…

The second method is to Sew the Granny Squares together. I found a great tutorial from Lion Brand Yarn to demonstrate this method… Click Here for the tutorial on How to Invisibly Seam Granny Squares Together Method…

Stitches:

Sl St – Slip Stitch     Ch – Chain     Hdc – Half Double Crochet

Instructions for Week 2:

Join your Granny Squares together in on of the above methods.  You will join them in 2 rows of 4 squares.  See my Granny Squares below for placement.

.

wpid-IMG_20140119_145132_074-1.jpgThis is the front side of my Joined Granny Squares…

.

wpid-IMG_20140119_145445_417-1.jpg

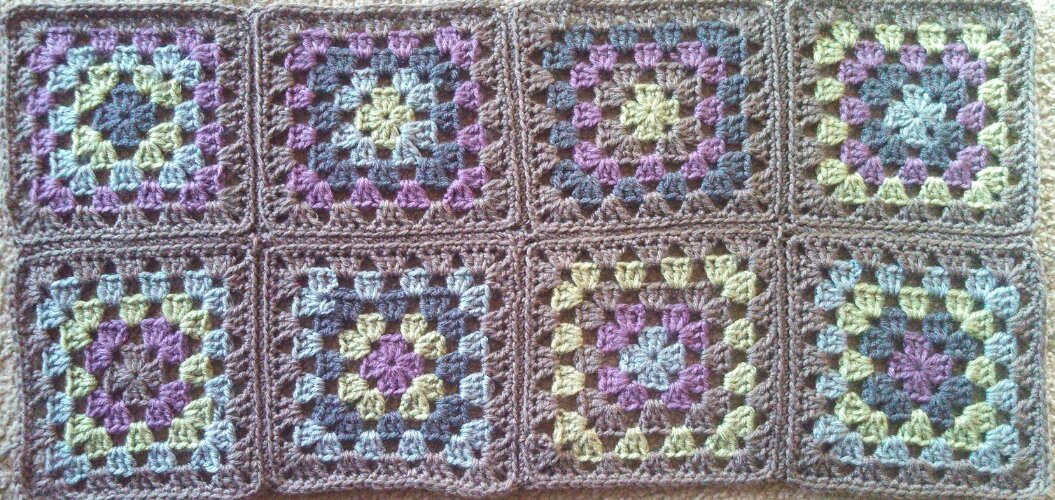
This is the back side of my Joined Granny Squares… Notice the slight ridge the Sc joining forms… I like this for my self and over time the ridge slightly lessens as the yarn settles into place.  But, if you don’t like the ridge the whip stitch method would be a better choice for joining.

.

Step 2 – Working with neutral or main color:

*Tip 1: You will want to make sure when making row 1 & 2 that the top and bottom row have the same number of stitches and the right and left sides each have the same number of stitches. 

*Tip 2:  When working or row 1 & 2…It will be important to have an even amount of stitches on each side of your work, the exact count isn’t important,,, but the even numbering is!!  Next weeks pattern section will be thrown off if you have odd amounts of stitches…When counting your stitches,  the center stitch of the corner will not be added into your count..  You should check your stitch count at the end of each of the four sides and make sure it is an even number and that the parallel sides have the same number of stitches… This will ensure your afghan will remain in an even rectangle shape.

Row 1:      Join with Sl St in any corner.  Ch 1, 3 Sc in corner. *Sc in each stitch across to the next corner, 3 Sc in Corner*. Repeat * * Around, join with Sl St to first Sc.

Row 2:     Ch 4 (counts as Hdc plus ch 2 for corner), Sk 1 Sc, Hdc in next Sc.  *Hdc across to 1st Sc of next corner. You will skip the center Sc of previous row corner, Ch 2, Hdc in next St and each across to next corner*. Repeat * * Around, Join with Sl St to 2nd chain of beginning Ch 4. Finish off. You should have approx 44 Hdc on the sort sides of the rectangle and 94 Hdc on the long ends of the rectangle.

Below is an up close picture of the corners for reference.

wpid-IMG_20140124_214857_329-1.jpg

.

And here is a photo of week 2 completed… 8 Granny Squares joined, 1 row of Sc’s, 1 Row of Hdc’s….

wpid-IMG_20140125_120834_715-1-1.jpg

.

Congratulations… You have finished Week 2!!!  Don’t forget to hop over to Facebook next Friday for Show and Tell at 5Pm EST… and Pinterest to see what everyone has done so far!!!

Happy Crocheting… Elena

.

..

.

.

.