Disclaimer: This post includes affiliate links that I may get compensation from if you decide to make a purchase. Thank you for the support!
The Every-Cloth

The Every-Cloth

The Every-Cloth Crochet Pattern – The ultimate round, multiuse kitchen dishcloth, potholder, trivet, and floor cloth. Double Thick – Double Sided!

The Every Cloth

Make sure to add this to your RAVELRY favorites and queue for easy access… Click Here!


The Every-Cloth: Free crochet pattern, infinite uses around the home.

Meet The Every-Cloth, a classic, durable round crochet pattern designed for ultimate multiuse functionality. Thick enough to protect your countertops as a trivet or shield your hands as a potholder, yet flexible and textured enough to serve as an everyday kitchen dishcloth or a heavy-duty floor cleaning cloth.

Ditch the disposable sponges and paper towels. Whether you need to scrub a pan, handle a hot cast-iron skillet, or wipe down the floors, this seamless circle is designed to tackle it all.

Pattern Highlights:

  • Shape: Ergonomic round design that is easy to hold, holds its shape in the wash, and looks beautiful on display.
  • Multiuse Design: Transitions seamlessly from a heat-resistant potholder to a rugged cleaning cloth.
  • Eco-Friendly: A fast, functional stash-buster perfect for creating a zero-waste home or gifting to friends.
  • Skill Level: Advanced Beginner / Easy.
  • Stitching: Just single crochet(and one row of half double crochet)!

Are you ready to make this easy and fun crochet pattern… Simple row repeat, no seams, quick to make!

You can make them in any color scheme or even as a bonus… I have provided instructions for this adorable EVERY-CLOTH PUMPKIN at the bottom of the instructions!

The Every Cloth Pumpkin

Flat on one side and a fun, flower-like pattern on the other side!! 8″ across and 1/2″ thick

The Every Cloth Double Sided

Materials:

Cotton Yarn – 140 yard. I used Hobby Lobby I Cotton for the solid color ones and Hobby Lobby Crafters Secret Cotton for the pumpkin

Hook – Size G

Place marker, scissors and yarn needle

Stitches: US Terms

  • Ch – Chain
  • St – Stitch
  • Sc – Single Crochet
  • Hdc – Half Double Crochet
  • Inc – Increase
  • Dec – Decrease

*Tips – You will work in continuous sc rounds without joining for most of this project to avoid the way joining may look. It works best if you place a marker in the first stitch every time you come to the beginning of the round so you can identify where you start the next round. If you prefer to join each round that is makers option.

Instructions:

Round 1: Leaving a 12″ tail, Ch 2, 6 sc in 2nd ch from hook, no join(you now will work in continuous stitching, placing marker in 1st st and moving it each round). = 6 sc

Round 2: 2 sc in each stitch around. = 12 sc

Round 3: *Sc in st, 2 sc in next st*, repeat *to* around. = 18 sc

Round 4: *Sc in 2 sts, 2 sc in next st*, repeat *to* around. = 24 sc

Round 5: *Inc in st, sc in next 3 sts*, repeat *to* around. = 30 sc

Round 6: Sc in 2 sts, *inc in next st, sc in next 4 sts*, repeat *to* around to last 2 sts, sc in last 2 sts. = 36 sc

Round 7: *sc in 5 sts, inc in next st, repeat *to* around. = 42 sc

Round 8: Sc in 3 sts, *inc in next st, sc in next 6 sts*, repeat *to* around to last 3 sts, sc in last 3 sts. = 48 sc

Round 9: *Inc in next st, sc in next 7 sts*, repeat *to* around. = 54 sc

Round 10: Sc in 4 sts, *inc in next st, sc in next 8 sts*, repeat *to* around to last 4 sts, sc in last 4 sts. = 60 sc

Round 11: *Inc in next st, sc in next 9 sts*, repeat *to* around. = 66 sc

Round 12: Sc in 5 sts, *Inc in next st, sc in next 10 sts*, repeat *to* around to last 5 sts, sc in last 5 sts. = 72 sc

Round 13: *Inc in next st, sc in next 11 sts*, repeat *to* around. = 78 sc

Round 14: Sc in 6 sts, *inc in next st, sc in next 12 sts*, repeat *to* around to last 6 sts, sc in last 6 sts. JOIN. = 84 sc

Round 15: Ch 1, hdc in each st around, join to top of 1st hdc. = 84 hdc

Rounds 16-25: Continuous sc in each st around, moving marker up in 1st sc each round. = 84 sc

Round 26: *Sc in 12 sts, dec over next 2 sts*, repeat *to* around. = 78 sc

Round 27: Sc in 6 sts, *dec over next 2 sts, sc in next 11 sts*, repeat *to* around to last 5 sts, sc in last 5 sts. =72 sc

Round 28: *Sc in 10 sts, dec over next 2 sts*, repeat *to* around. = 66 sc

Round 29: Sc in 4 sts, *dec over next 2 sts, sc in next 9 sts*, repeat *to* around to last 5 sts, sc in last 5 sts. = 60 sc

Finish of leaving 12″ tail

Using a yarn needle, weave tail thru each st of round 29 and draw closed tightly(you will still have a small opening), going in the opposite directions, weave tail thru center again and pull closed tightly(this should close center.

Pick up 1st tail from round 1 and bring thru centers to meet the tail of round 29, tie them together securely making sure the bottom and top of the circle are together. Weave tails in.

The row of hdc should be on the outer rim of the circle. Gently pull circle to stretch and make it lay flat. The top should look similar to a circle.

FOR THE PUMPKIN

Repeat pattern using orange cotton yarn for rounds 1-26, change to brown for rounds 27-29. For the tail at the end or round 29, leave it a longer at approx. 2 yards to make the stem.

Pick up 1st tail from round 1 and bring thru centers to meet the tail of round 29, tie them together securely making sure the bottom and top of the circle are together.

STEM: Using the longer brown tail, ch 9, starting in 2nd ch from hook make 3 sc in each of the next 7 chs leaving last ch unworked. Secure the tails once more by tying the 2 tails together and weave them in.

Congratulations!!!! You now have an Every Cloth and/or very cute Pumpkin Cloth!!!


Make sure to post pics and share on social media to spread the Love of Crochet!!! *please also share the link to my pattern to help support my free crochet pattern business… Thank you

And,Don’t forget to follow me on my social media sites for more fun! And, most important you share your creations

Also, If you would like to receive all my latest posts/patterns directly into your email… Fill out the “Stay Connected” Box in the top righthand side of this website!

Facebook, Instagram, My CAL Facebook Group, and Pinterest

I hope you love this project!!  Finally, make sure to share your finished projects on my Beatrice Ryan Designs Facebook Page and make sure to share around social media too! Why share?? Because it shares our Love of Crochet!!

Until we meet again, Happy Crocheting!!!

Elena


©Copyright 2026 Elena Hunt/Beatrice Ryan Designs.  All of my patterns and posts are my own work. Do not copy them in any way. If you want to share this information with someone, share the link to this post. Additionally, If you want to share on your own blog, website or social media, then you may use the first photo in this post and link back to this post. You may not give away printed copies of this post. Thank you. This post may contain affiliate link

2022 Fall Gift Giving Finale & Grand Prize Winner!

2022 Fall Gift Giving Finale & Grand Prize Winner!


Wow!!! Time flew by with this 2022 Fall Gift Giving CAL!! I loved designing and making the 12 dishcloths and I hope you did too! Each project showed different crochet techniques that I hope you loved and will use in the future!

If you haven’t made them yet, no worries! They are all available in the Free Pattern Page or the Crochet with Me tab at the top of the page. Also, very soon they will be available in a PDF Ebook Format for sale! Stay tuned!!!


For this years 2022 Fall Gift Giving CAL, below you can see the fan gallery of projects that were made. The ones that are numbered qualified for the Grand Prize of a $50 Amazon E Gift Card. If you still want to have your projects in the fan gallery, just email your pics to [email protected]. The Grand Prize Drawing is now closed, but we love to share!

Fan Gallery for the Grand Prize… 14 entries… Thanks to all for participating!

  1. Kathy F.
  2. Katie H.
  3. Kathy K.
  4. Nancy N.
  5. Margie D.
  6. Connie P.
  7. Diana H.
  8. Sheila T.
  9. Lynell R.
  10. Lora S.
  11. Anna A.
  12. Linda L.
  13. Cindy M.
  14. Chris D.

Using a random number generator, Our winner is….. #10 Lora S!!!! Congrats Lora… Send me and email to [email protected] so I can forward the $50 Amazon E Gift Card!


I love doing the Crochet Alongs,,, In the next few weeks you will see the information about the 2023 Winter Crochet with Me CAL.. So stay tuned!

Don’t forget to follow me on my social media sites for more fun!

Facebook, Twitter, Instagram, My CAL Facebook Group, and Pinterest

I hope you love this project!!  Make sure to share your finished projects on my Beatrice Ryan Designs Facebook Page and make sure to share around social media too! Why share?? Because it shares our Love of Crochet!!

Happy Crocheting!!

Elena


©Copyright 2022 Elena Hunt/Beatrice Ryan Designs.  All of my patterns and posts are my own work. Do not copy them in any way. If you want to share this information with someone, share the link to this post. If you want to share on your own blog, website or social media, then you may use the first photo in this post and link back to this post. You may not give away printed copies of this post. Thank you. This post may contain affiliate link

Apache Tears Dishcloth… Free Crochet Pattern

Apache Tears Dishcloth… Free Crochet Pattern


The Apache Tears Dishcloth packs a punch of color and fun! Using 2 simple stitches that create this fun textural effect, you can use up all of your scraps, create your own unique color combo and then enjoy!

This is Week 12 of the 2022 Fall Gift Giving Crochet Along… The final week! I hope you have enjoyed this 12 week – 12 dishcloth CAL!!! Stay tuned for more fun, free patterns and the 2023 Winter Crochet With Me Afghan CAL… Details coming soon!

The great thing about this pattern, you don’t have to weave in ends! I hope you give it a try, it is much easier than it looks!!! Also there is a YouTube Video to show you how easy it really is!

Also, all 12 of the dishcloth patterns will be available in an Ebook PDF soon… $5.99 and it will be available on Ravelry… I will post that here when available!

Please add this to your Ravelry Favorites for easy access too!! Click Here…


Grand Prize details and past 11 patterns of the 2022 Fall Gift Giving CAL:

Grand Prize – Thanksgiving Weekend I will post fan pictures that are entered to me by email of the finished dishcloths… One lucky winner will receive a $50 Amazon Gift Card. Here are the rules… By Friday November 25th, 2022 11:59pm PST US you will email me a picture of your finished CAL dishcloths (6 of the patterns minimum all in one picture) to [email protected]. One entry per person. Each entry will be numbered and I will use a Random Number Generator to draw the winner on Sunday November 27th 2022 and post the Fan Gallery and winner that afternoon.

Waffle Stitch Textured Dishcloth – Week 1

Waffle Stitch Dishcloth

Summer Squiggles Dishcloth – Week 2

Summer Squiggles Dishcloth

Bavarian Stitch Dishcloth – Week 3

Bavarian Stitch Dishcloth

Alpine Stitch Dishcloth – Week 4

Autumn Acorn Dishcloth – Week 5

Autumn Acorn Dishcloth

Optical Illusion Dishcloth Week 6

Simple Cluster Dishcloth Week 7

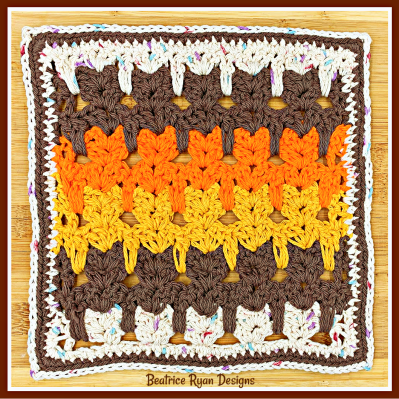
Easy Cat Dishcloth Week 8

Easy Pumpkin Dishcloth Week 9

Easy V-Puff Dishcloth Week 10

Simple Chevron Dishcloth Week 11


Now on to Week 12 – Apache Tears Dishcloth

Tips:

  • It is super easy, there are NO ends to weave in for this project.
  • You can choose any color scheme to make it your own.
  • A minimum of 2 colors is required to get the effect
  • You will not turn after row 2, just finish off and move back to the right hand side to start the next row. Another words you always work on the right side of the project.
  • You will change colors every row
  • You always start and end each row with a sc, all the stitches in between are worked in the front loop
  • Each row move the fldc over one st to create the look
  • Make sure not to blsc in the st you used for the fldc
  • Leave a 2″ tail on both the beginning join side and finish off side

Size:

9 1/2″ x 9 1/2″

Materials:

Yarn: 150 total Yards of Cotton Yarn

I used the following:

Color A – Purple Color B – Orange Color C – Green

Color D – Blue Color E – Yellow Color F – White

Hook: G

Stitches:

  • St – Stitch
  • Ch – Chain
  • Sc – Single Crochet
  • Dc – Double Crochet
  • Bl – Back Loop
  • Fl – Front Loop

Here is a link to a great YouTube Video that shows how to do this pattern. Keep in mind, She uses a 6 st repeat and I use a 5 stitch repeat. Click Here

Instructions:

Changing colors each row, below are the color scheme I did. Starting with the ch row and row 1: A, B, C, D, E, F. After Row 1 you will finish off each row and without turning, join the next color to the first st on the righthand side.

Starting with Color A, Ch 38

Row 1 : Sc in 2nd ch from hook and each across = 37 sc Finish off and Move to the RH side to join next color

Row 2: Ch 1, sc in 1st st, blsc in the next 35 sts, sc in last st. = 2 sc & 35 blsc Finish off and Move to the RH side to join next color

Row 3: Ch 1, sc in 1st st, *Dc in fl of st 2 rows below (color A), Pic below, blsc in next 4 sts*, repeat *to* across, sc in last st. . = 7 fldc , 2 sc & 28 blsc(all rows now will have this count). Finish off and Move to the RH side to join next color

Row 4: Ch 1, sc in 1st st, bl sc in next st(a dc st), * fldc in next st 2 rows below(color B row), blsc in next 4 sts*, repeat *to* 5 more times, fldc in next st 2 rows below, blsc in next 3 sts, sc in last st. Finish off and Move to the RH side to join next color

Row 5: Ch 1, sc in 1st st, bl sc in next 2 sts, * fldc in next st 2 rows below(color c row), blsc in next 4 sts*, repeat *to* 5 more times, fldc in next st 2 rows below, blsc in next 2 sts, sc in last st. Finish off and Move to the RH side to join next color

Row 6: Ch 1, sc in 1st st, bl sc in next 3 sts, * fldc in next st 2 rows below(color d row), blsc in next 4 sts*, repeat *to* 5 more times, fldc in next st 2 rows below, blsc in next st, sc in last st. Finish off and Move to the RH side to join next color

Row 7: Ch 1, sc in 1st st, *blsc in next 4 sts, fldc in next st 2 rows below*, repeat *to* across, sc in last st. Finish off and Move to the RH side to join next color

Rows 8 – 35: Repeat rows 3-7 changing colors in the same sequence.

Tails

Tie simple knots with every 2 tails together down both sides to secure tails. With a fine tooth comb or brush, brush out each tail to separate all the strands. Trim brushed fringe to a 1″ length(or desired length)

Lightly block to shape and make fringe lay flat

This is a picture of the back of the project!

That’s it!!! You now have an Apache Tears Dishcloth!! Enjoy and make as many as you can for gifts.

I have so much enjoyed this 2022 Fall Gift Giving CAL. I love seeing all of the finished projects in the Beatrice Ryan Designs CAL Facebook Group !!! Please share your pictures with your friends too!


This Week’s Amazon Favorite! Liquid Motion Sand Art… This year the girls in my family are getting one for Christmas… I know they will love them!!!


Also, Don’t forget to follow me on my social media sites for more fun!

Facebook, Twitter, Instagram, My CAL Facebook Group, and Pinterest

I hope you love this project!!  Finally, make sure to share your finished projects on my Beatrice Ryan Designs Facebook Page and make sure to share around social media too! Why share?? Because it shares our Love of Crochet!!

Happy Crocheting!!

Elena


©Copyright 2022 Elena Hunt/Beatrice Ryan Designs.  All of my patterns and posts are my own work. Do not copy them in any way. If you want to share this information with someone, share the link to this post. Additionally, If you want to share on your own blog, website or social media, then you may use the first photo in this post and link back to this post. You may not give away printed copies of this post. Thank you. This post may contain affiliate link