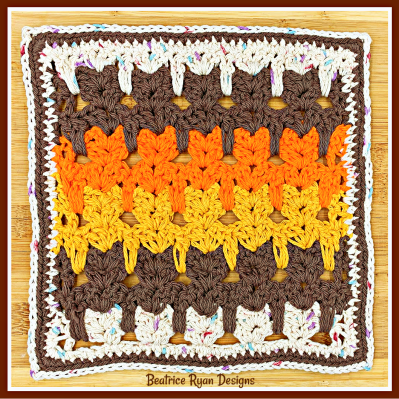
Patriotic Crochet Sampler Throw is a fun and whimsical project! Super fun in the Red, White and Blue for a 4th of July project! You could also do it in Christmas Colors, Fall Colors or even School Colors… This project has 4 different crochet elements for you to have fun with!

The Patriotic Crochet Sampler Afghan is an easy project with 4 different stitching techniques and an envelope border to hide all the tails so you don’t have to weave them in!!!
You can get the pattern here on Beatrice Ryan Designs for FREE or head to Ravelry for a paid PDF. And, don’t forget to add this to your Ravelry queue and favorites for easy access! Click Here to head to Ravelry!!!
The pattern starts off with the Apache Tears Crochet Stitch… This is an easy stitch pattern that uses single crochet and front post double crochet that is worked by always joining on the right side for each row. This leaves tons of tails so I either like to make it with leaving them for a fringe or finishing the project with an envelope border to encapsulate them(that is what we did for this throw)

Second, we do a Interlocking Block Stitch… This stitch technique is so easy and fun to make with multiple colors… Just double crochets and chains!!! This leave some tails too, so another great reason to use the envelope border!

Thirdly, we have a striped section using one of my favorite stitches… The DC Cluster V Stitch, so easy and fast! Again, double crochets and chains make this so easy! And the texture is so great for an afghan!

The last stitching technique is a Simple Shell Stitch… Easy peasy!!! This stitch creates lots of dimension and fun color! Using multiple colors makes this pop! Treble crochet, chains and single crochets make this stitching technique work up quickly!

To finish the Patriotic Crochet Sampler Throw we use the Envelope Border. This is a great way to finish any crochet afghan… It takes a little work and patience, but the end result is amazing… You loosely front post slip stitch around the entire project(this is slightly time consuming), then work a half double crochet border in the front loops of the slip stitches and also work them in the back loops of the slip stitches on the opposite side. Then, to close the “envelope” around the ends… You just single crochet the tops of the two hdc pieces together… Easy, but takes just a little work with a really great pay off!!!
I hope you love this project and give it a try!!! Let’s get to work on it!!!
Materials:
YARN- 3 colors of worsted weight yarn. I used Red, White & Blue for the Patriotic Theme!
I used Red Heart Super Saver Jumbo Skeins in the following colors. A – Cherry Red 744 yard skein (used 733 yds) B – Soft White – 744 yard skein and 198 yard skein(total used 782 yds) C – Royal Blue 744 yard skein(used 697 yds) *You may have a different total yardage depending on your yarn and tension
HOOK- J and K
Place Markers and Scissors
Shop Yarnspirations – Amazon or any of your favorite shops!!!
Stitches: US Terms
- Ch – Chain
- St – Stitch
- Sp – Space
- Sk – Skip
- Sl St – Slip Stitch
- Sc – Single Crochet
- Hdc – Half Double Crochet
- Dc – Double Crochet
- Trc – Treble Crochet
- Blsc – Back Loop Single Crochet
- Fpdc – Front Post Double Crochet
- YO – Yarn Over
- Dc V St Cl – Double Crochet V Stitch Cluster: Yo, insert hook in st/sp, pull up loop, yo draw thru 2 loops, yo, insert in same st/sp and pull up loop, yo and draw thru 2 loops, yo and draw thru all 3 loops on hook,* ch 1, repeat in same sp or loop(only ch 1 between 2 clusters in same st, not between V sts
Tips:
The right side of the project will always be where the fpdc shows on the Apache Tears section
Due to multiple sampler stitch techniques, some sections require different final stitch counts, so you will have extra starting stitches on one side when this applies.
Size:
42″ x 64″ Blocked
Instructions:
Start with the K Hook and Color A
Starting with the Apache Tears Stitch Section – You will finish off each row and join the next row/color on the right side in the 1st st of the last row leaving a 3″ tail on both sides
*Each color is used for several rows, see notation when to change colors
Chain 115
Row 1: Sc in 2nd ch from hook and each across = 114 sc Finish off and Move to the RH side to join
Row 2: Ch 1, sc in 1st st, blsc in the next 112 sts, sc in last st. = 2 sc & 112 blsc Finish off and Move to the RH side to join
Row 3: Ch 1, sc in 1st st, *Dc in fl of st 2 rows below (color A), Pic below, blsc in next 6 sts*, repeat *to* across, sc in last st. . = 16 fldc , 2 sc & 96 blsc(all rows now will have this count). Finish off and Move to the RH side to join

*Please note the picture above only has 3 sts instead of 6 between the fpdc sts. This is picture is just to show how to place the sts.*
Row 4: Ch 1, sc in 1st st, bl sc in next st, * fldc in next st 2 rows below, blsc in next 6 sts*, repeat *to* 14 more times, fldc in next st 2 rows below, blsc in next 5 sts, sc in last st. Finish off and Move to the RH side to join
Row 5: Ch 1, sc in 1st st, bl sc in next 2 sts, * fldc in next st 2 rows below, blsc in next 6 sts*, repeat *to* 14 more times, fldc in next st 2 rows below, blsc in next 4 sts, sc in last st. Finish off and Move to the RH side to join
Row 6: Ch 1, sc in 1st st, bl sc in next 3 sts, * fldc in next st 2 rows below, blsc in next 6 sts*, repeat *to* 14 more times, fldc in next st 2 rows below, blsc in next 3 sts, sc in last st. Finish off and Move to the RH side to join
Row 7: Ch 1, sc in 1st st, bl sc in next 4 sts, * fldc in next st 2 rows below, blsc in next 6 sts*, repeat *to* 14 more times, fldc in next st 2 rows below, blsc in next 2 sts, sc in last st. Finish off and Move to the RH side to join
Row 8: Ch 1, sc in 1st st, bl sc in next 5 sts, * fldc in next st 2 rows below, blsc in next 6 sts*, repeat *to* 14 more times, fldc in next st 2 rows below, blsc in next st, sc in last st. Finish off and Move to the RH side to join
Row 9: Ch 1, sc in 1st st, *sc in next 6 sts, fpdc in next st 2 rows below*, repeat *to* 15 more times. Finish off and move to the RH side to join
Change to Color B
Rows 10-16: Repeat rows 3-9
Change to Color C
Rows 17-23: Repeat rows 3-9
Rows 24-44: Repeat rows 3-23 changing colors to A, B and C in the same manner
Interlocking Block Section – In this section you will have 5 beginning stitches on the right side and 4 ending stitches on the left side and continue to rejoin each row on the right side as before.
*In this section you will have 5 beginning stitches on the right side and 4 ending stitches on the left side
Change to Color A and join on the right side
Row 45: Ch 3(counts as dc now and throughout), dc in next 4 sts, *ch 3, sk 3 sts, dc in next 3 sts*, repeat *to* across, dc in last st. = 18 ch 3 sp & 60 dc Finish Off
Change to Color B and Join on the Right Side
Row 46: Sc in 1st st, ch 4, sk 4 sts, 3 dc around previous ch3 into the 3 open sts below, ch 3, sk 3 sts*, repeat *to* across, sc in last st. 18 ch 3, 1- ch4, 2 sc, 54 dc, Finish Off
Change to Color C and Join on the Right Side
Row 47: Ch 3(counts as dc now and throughout), 4 dc around previous ch4 into the 4 open sts below *ch 3, sk 3 sts, dc in next 3 sts*, repeat *to* across, dc in last st. = 18 ch 3 sp & 60 dc Finish Off
Changing Colors as you did in rows 45-47 A, B & C
Rows 48-79: Repeat rows 45, 46 & 47
Double Crochet V Stitch Cluster Section – You will work 6 rows of each color and you will be turning each row instead of rejoining on the right side. ** You will join in the stitch you finished the last row in
Join color A on right side
Row 80: Ch 1, sc in 5 sts, *dc around the ch 3 into the missed 3 sts below, sc in next 3 sts*, repeat *to* across to the last st, sc in last st. – 60 sc & 54 dc
Row 81: Ch 3, dc in next st, *sk 2 sts, dc v st cl in next st*, repeat *to* across, sk 2 sts, dc in last 2 sts. = 4dc & 36 dc v st cl
Rows 82-86: Ch 3, turn, dc in next st, dc v st cl in each ch1(of previous row) across, dc in last 2 sts. = 4dc & 36 dc v st cl Finish Off after 86
Join Color B
Rows 87-92: Repeat row 82
Join Color C
Rows 93-98: Repeat row 82
Shell St Section – You will have 2 beginning sts and one ending st
Join Color A
Row 99: Ch 1, sc across increasing 2 sc evenly to make st count work. = 114 sc
Row 100: Ch 1, turn, sc in 1st 2 sts, sk 3 sts, *7 trc in next st, sk 3 sts, (sc,ch1,sc) in next st, sk 3 sts*, repeat *to* across, sc in last st. 3 sc, 14 7trc groups & 13(sc,ch1,sc) Finish Off
Join Color B
Row 101: Ch 4(counts as trc now and throughout), 3 trc in same st, *(sc,ch1,sc) in middle st of previous trc group, 7 trc group in next ch 1 sp of(sc,ch1,sc in previous row)*, repeat *to* 12 more times,(sc,ch1,sc) in middle st of previous 7trc group, 4 trc 2nd to last st, trc in last st. = 13 7trc groups, 2 4trc groups & 14 (sc,ch1,sc) Finish Off
Join Color C
Row 102: Sc in 1st 2 sts, *7 trc in ch 1 sp of previous(sc,ch1,sc), (sc,ch1,sc) in middle st of previous(sc,ch1,sc)*, repeat *to* 12 more times, 7 trc group in next ch 1 of previous(sc,ch1,sc), sc in last st. = 14 7trc groups, 3 sc & 13 (sc,ch1,sc) Finish Off
Rows 103-114: Repeat rows 101 & 102 Changing colors in the same manner
Envelope Border – This is a great border to hide tails and makes a great finish. You will work a 3 row edge on both the front and back into a sl st you will be making around the throw. Then sealing it together with a sc encapsulating the tails, Just be patient with the process and you will love this border!!!

Join Color A
Round 1: Ch 2(counts as hdc now and throughout), hdc in next st, sc in next 5 sts, *hdc in next st, sk st, hdc in ch 1, sk st, hdc in next st, sc in next 5 sts*, repeat *to* across, hdc in last 2 sts. = 114 sts Do Not Finish Off
Continuing with Color A
** Tip** As you work this row, push tails to the back as you sc, then when done with row, pull tails up thru the center of the v of each sc so it is easier to hide them in the envelope. Lastly tie 2-3 tails together to make them secure and trim them to 2ish”- see pic)

Round 2: Ch 1, turn, sc across, 2 more sc in last st(corner), evenly sc 164 sts down the side rows, 3 sc in 1 st of bottom(corner, sc in next 112 st of row 1, 3 sc in last st of row 1(corner), evenly sc 164 sts up side rows, 2 sc in 1st st of row 115(corner), join with sl st. = 564 sc
Join Color B With right side facing(The Apache Tears section will have the FPDC showing when on the right side) around the post of the 3rd sc on the top right side(round 2). We use color B because it will be easier to see when working the next rounds.
Round 3: Loosely sl st around each sc post around the entire throw placing a marker in the corner st of each corner( you only make one sl st in each corner), join to beginning sl st and Finish off. = 564 sl sts

*Tip – You will start working on the wrong side in the sl sts, this side is the hardest to work due to the sl sts on this side are a bit tighter. Take your time… The rest of the border is easy to work.


This is the right side, work this 2nd This is the wrong side, work this 1st
Join Color C in any sl st from round 3 on the wrong side(you will see these sl sts because they are all color B)
Change to Hook J( this will make the border fit better with the project, K will make it to loose)
Round 4: Ch 2, work hdc in each sl st around, and 3 hdc in each middle st where you placed the markers, join with sl st to top of ch 2 = 572 hdc
Round 5: Sl st in the next 2 st(this makes the joining look a bit better in the finished project), ch 2, hdc in each st around, 3 hdc in each corner middle st, Join with sl st to top of ch 2. = 580 hdc
Round 6: Repeat round 5. = 588 hdc. Finish off
Turn to the right side facing and Join Color B in any sl st
Rounds 7-9: Repeat rounds 4-6 in the sl sts on the front side(these should show well in color B) Finish Off
Sealing the Envelope Border
Join Color A in both the front and back hdc borders in any corner sts, you need to match the two sides up as you go around

Round 10: Ch 1, sc around in both sts of the front and back border to seal the envelope all the way around, with 3 sc in the corner sts, tucking the tails in as you work. Join with sl st and Finish Off
Block the Patriotic Crochet Sampler Throw to make it look great!
That’s It!!! You now have completed this fun project!!! Please share your pictures on social media and tag me (Beatrice Ryan Designs) so I can see them!! Or you can email me your pics to [email protected] and I will post them on my social media. Please include permission in your emails.
If you would like to receive all of my post by email, fill out the “Stay Connected” box on top right hand side bar!!!
New Favorite Find!!!
If you love coffee like I do, I found a fun new way to get premium coffee delivered right to your door! Trade Coffee Company! They work with hundreds of roasters to bring their customers amazing coffee! You just take a short quiz and they pick a coffee they think you will love!
My first order I received a 2lb bag of Milk and Honey Coffee… So Good. I signed up for a subscription to receive a different 2lb bag of coffee every 4 weeks… There are many different coffee subscriptions to choose from… Prices seem good too!

By using my link you will get 50% off your first bag(I get a $10 coffee credit).. I hope you check it out and give it a try! Click here to use my link and purchase your coffee!!
Also, Don’t forget to follow me on my social media sites for more fun!
Facebook, Instagram, My CAL Facebook Group, and Pinterest
I hope you love this project!! Finally, make sure to share your finished projects on my Beatrice Ryan Designs Facebook Page and make sure to share around social media too! Why share?? Because it shares our Love of Crochet!!
Happy Crocheting!!
Elena
©Copyright 2026 Elena Hunt/Beatrice Ryan Designs. All of my patterns and posts are my own work. Do not copy them in any way. If you want to share this information with someone, share the link to this post. Additionally, If you want to share on your own blog, website or social media, then you may use the first photo in this post and link back to this post. You may not give away printed copies of this post. Thank you. This post may contain affiliate link