Disclaimer: This post includes affiliate links that I may get compensation from if you decide to make a purchase. Thank you for the support!

Midnight Breeze Shawl

This beautiful shawl was inspired by cool summer nights in the mountains of Northern California…. And it would make a wonderful Prayer Shawl!!

.

Midnight Breeze Shawl

You can collect this pattern in your Ravelry Favorites and Queue too,, Click Here!

This shawl measures  18″  x 78″


Materials:

840 Yards of Worsted Weight Yarn – Recommend using Self Striping Yarn ~ Original design was made using Red Heart Boutique Unforgettable  – Color “Tidal”


Hook ~ I

Scissors


Stitches:

St, Sts – Stitch, Stitches      Sl St – Slip Stitch      Ch –  Chain      Sc – Single Crochet      Dc – Double Crochet     Trc – Triple Crochet


Instructions:

Ch 191

Row 1:   Sc in 2nd  Ch from hook and each across. = 190 Sc

Row 2:   Ch 3 (Counts as Dc now and throughout), Turn,  *Skip next St, Dc in next 3 Sts, Dc in previous Skipped St to form a Crossover Stitch* (See Photo), Repeat * * Across, Dc in last stitch.  =47 Crossover Shell Stitches & 2 Dc

Crossover Shell Stitch

Rows 3 – 6:    Repeat row 2 four times.

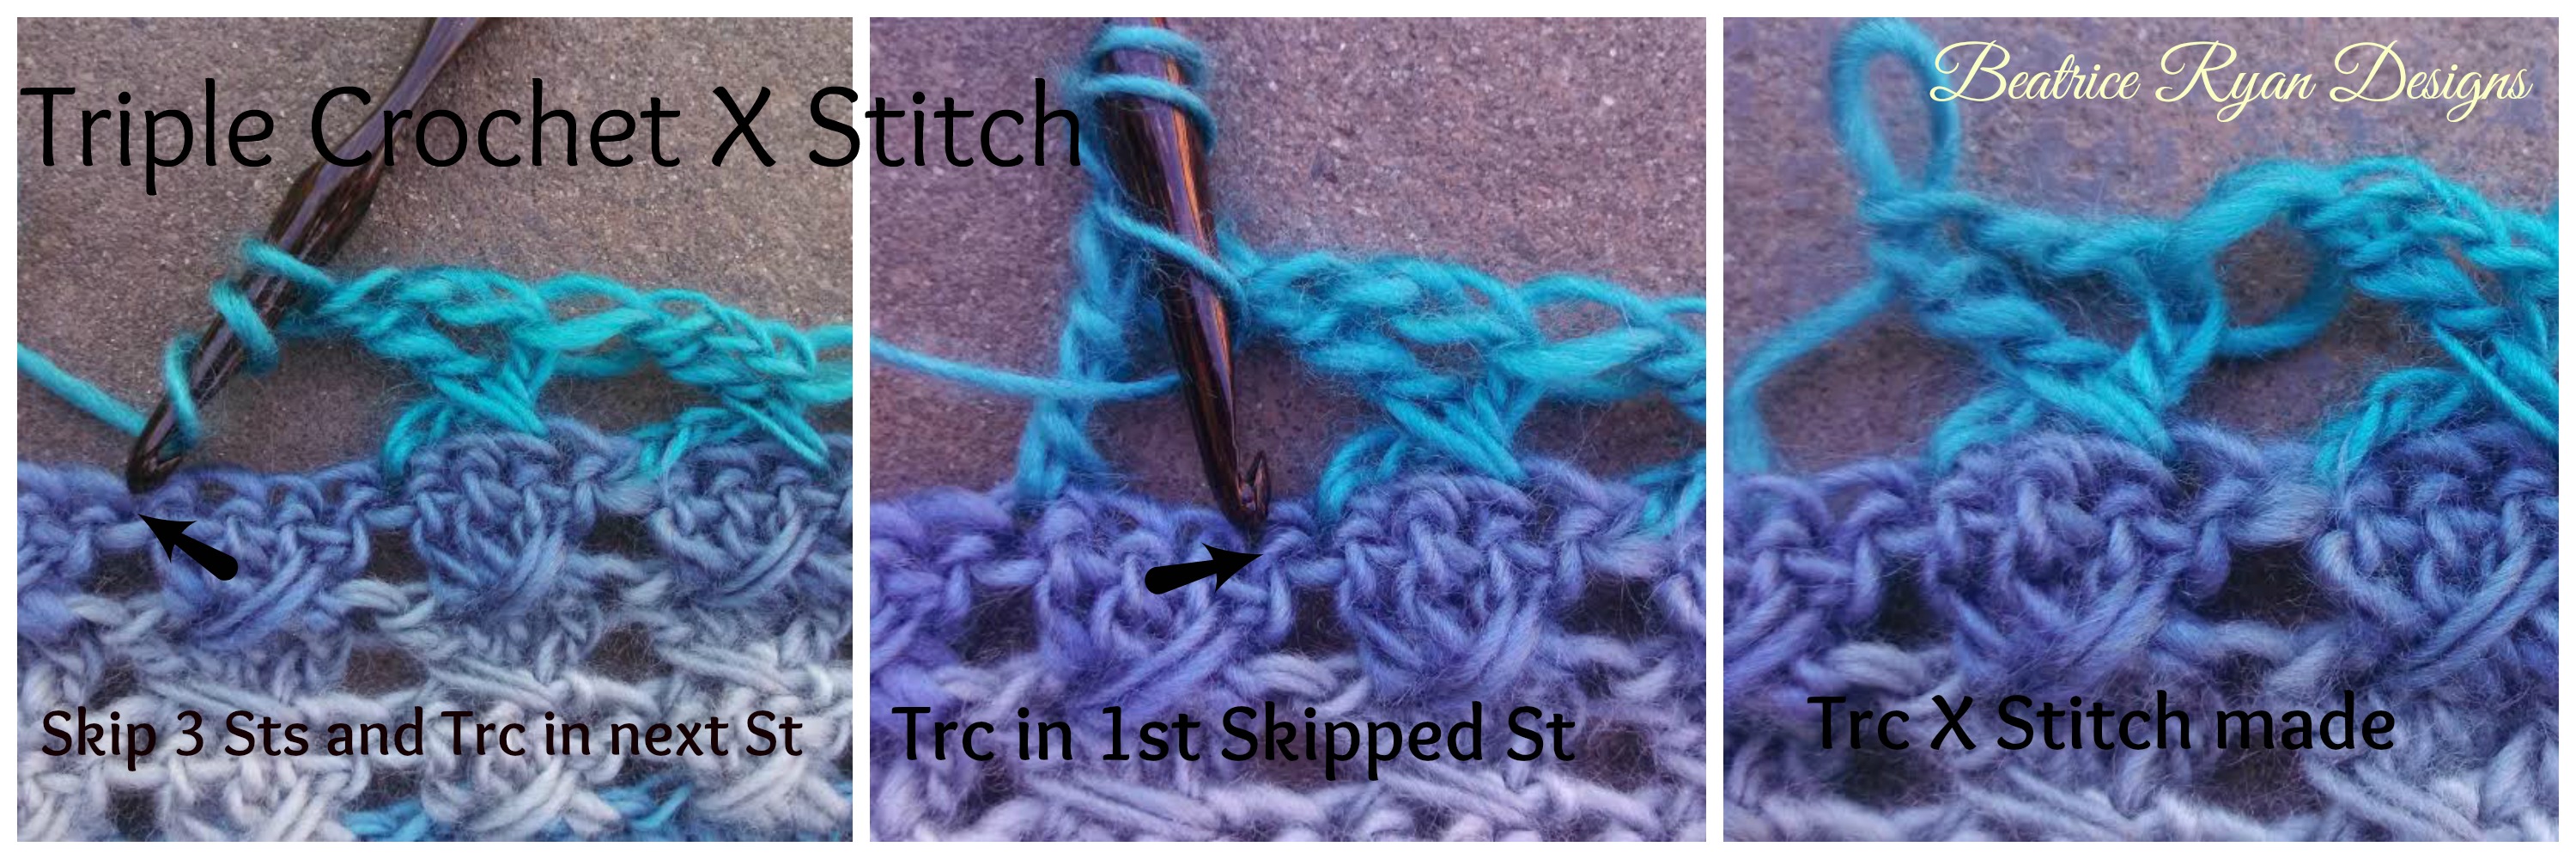
Row 7:    Ch 4 (Counts as Trc now and Throughout), Turn, * Sk 3 Sts, Trc in next St, Ch 2, Trc in 1st Skipped St to form and X Stitch* (See Photo), Repeat * * Across, Trc in last St.  = 47 X sts and 2 Trc.

Trc X Stitch

Row 8:   Repeat Row 7

Row 9:    Ch 1 Turn, Sc across. = 190 Sc

Rows 10 – 14:     Repeat Row 2

Row 15 – 16:   Repeat Row 7

Row 17:   Repeat Row 9

Rows 18 – 22:   Repeat Row 2

Rows 23 – 24:   Repeat Row 7

Row 25:   Repeat Row 9

Rows 26 – 30:   Repeat Row 2

Row 31:   Ch 1 Turn, Sc in next 189 Sts across to last St, 3 Sc in last St to form 1st corner., Working along side of rows,  Sc 69 Sts evenly across, 3 Sc in last St to form 2nd Corner, Sc 188 Sts across the bottom edge, 3 Sc in last St to form 3rd corner, Sc 69 Sts evenly up side of rows, 2 Sc in same as beginning to form 4th corner, Join with Sl St. = 526 Sc Finish Off

Edging

Midnight Breeze Shawl Ruffle

Working along short ends of the shawl

Row 1:    Join With Sl St to corner St. Ch 1, Sc in same St. *Sk 2, 5 Trc in next St, Sk 2, Sc in next St.* Repeat Across. 12 – Trc Shells & 13 Sc

Row 2:   Ch 1 Turn, Sc in 1st St and next St, *Ch 2, Sk 1 St, Sc in next St, Ch 2, Sk 1 St, Sc in next 3 Sts* Repeat * * Across to end. Sc in last 2 Sts.  = 47 Sc & 24 Ch 2 Spaces

Row 3:   Ch 1 Turn, Sc in 1st St, * Sk St, 3 Dc in Ch 2 Space, 1 Dc in next Sc, 3 Dc in next Ch 2 Space, Sk St, Sc in next St* Repeat * * Across to end = 84 Dc & 13 Sc

Row 4:   Ch 1 Turn, Sc in 1st St, *Dc in next St, 2 Dc in next St, Dc in Next St, 2 Dc in next St, Dc in next St, 2 Dc in next St, Dc in next St, Sc in next St* Repeat * * Across to end. = 120 Dc & 13 Sc

Row 5:   Ch 1 Turn, Sc in 1st St, *Trc in next 10 Sts, Sc in next St* Repeat * * Across. =120 Trc & 13 Sc

Row 6:   Ch 1 Turn, Sc in 1st St, *2 Sc each of next 10 Sts, Sc in next St* Repeat * * Across. =253 Sc

Finish off and Weave in ends…

I recommend blocking your shawl for the best result.  I used the Steam Blocking Method, but you may also dampen you shawl and pin it into place until dry.

Enjoy!

Midnight Breeze Shawl length   Midnight Breeze Shawl Stitching

Midnight Breeze Shawl

NOW … Also available in a video tutorial thanks to Bob Wilson 123!!

Click Here for the Link to the Midnight Breeze Shawl Video Tutorial!!

10408603_807659125950942_5935361104290437311_n

*** You may make and sell products from my patterns but if you do I ask that you link back to my post. Please do not copy and post these patterns and claim it as your own. Please do not re-publish photos as your own.***


Beatrice Ryan Designs Crochet-A-Long Afghan… Week 1

Here we go!  The time has finally come for us to start our Afghan!!  If you missed the materials list you can find that post in the Crochet-A-Long tab at the top of the page.  Each week I will post a Free Pattern section on Saturday morning…   All CAL weekly Free Pattern sections will be posted in the Crochet-A-Long tab throught the entire CAL.  Once complete it will be posted as a pattern in whole and available in the Pattern Tab.  You can follow along here each week, And you can also join me on Ravelry with my Crochet-A-Long Group, on Facebook each Friday evening for our “Show and Tell” and on our Pinterest Board designated just for this CAL… If you want to post your progress pictures on Pinterest you need to shoot me an email to [email protected] so I can add you to the group!

So here we go!!

This CAL will start with 8 basic Granny Squares, Each Granny Square should be approximately 6″-7″ across…  Gauge is not important so if you want to make a smaller or larger blanket you can adjust this by your hook size…The dominate or neutral color will be worked for the LAST ROW of each square.  You can use it more than once in your square if you desire.  These will be the only time we use Granny Squares in this pattern… We will be joining them together in a specific manner next week…  This afghan will be worked in the round.

.

wpid-IMG_20140112_131905_808-1-1.jpg     wpid-IMG_20140112_131237_504-1.jpg     wpid-IMG_20140112_131056_699-1.jpg

These are my 8 Granny Squares… I am loving my colors!!

.

Stitches:

Ch – Chain     Sl St – Slip Stitch     Sc – Single Crochet     Dc – Double Crochet

Tips:

I work over my ends as I go. This saves time weaving the ends in.  I also prefer the Magic Circle to start my project, Click Here for a video tutorial.  If you prefer to use the basic method of Ch 5, join into a ring that will work just fine!

You can use as many colors as you like, or make this a solid color afghan.

Instructions:  Make 8 Granny Squares

Make a Magic Circle

Row 1:     Ch 3 (Counts as Dc now and throughout), 2 Dc in center of ring, Ch 2, *3 Dc in ring, Ch 2*, Repeat * * 2 more times, Join with Sl St to top of Ch 3. Pull center tight = 4-Dc 3 clusters  and 4- Ch 2 spaces.   Fasten off.

Row 2:     Join next color to any Ch 2 space using a Sl St. Ch 3, 2 Dc in same as joining.  Ch 2, 3 Dc in same space, *Ch 1, 3 Dc in next Ch 2 space, Ch 2, 3 Dc in same space*, Repeat * * 2 more times. Ch 1 Join to top of Ch 3 with Sl St. Finish off. = 8 – Dc 3 clusters, 4 – Ch 2 Spaces and 4 – Ch 1 Spaces.

Row 3:     Join next color to any Ch 2 space using a Sl St. Ch 3, 2 Dc in same as joining.  Ch 2, 3 Dc in same space, *Ch 1, 3 Dc in next Ch 1 Sp, Ch 1, 3 Dc in next Ch 2 Sp, Ch 2, 3 Dc in same Ch 2 Sp*, Repeat * * 2 more times. Ch 1, 3 Dc in last Ch 1 space, Ch 1,  Join to top of Ch 3 with Sl St. Finish off. = 12 – Dc 3 Clusters, 4 – Ch 2 Spaces, 8 – Ch 1 Spaces.

Row 4:     Join next color to any Ch 2 space using a Sl St. Ch 3, 2 Dc in same as joining.  Ch 2, 3 Dc in same space, *Ch 1, 3 Dc in next Ch 1 Sp, Ch 1, 3 Dc in next Ch 1 Sp, Ch 1, 3 Dc in next Ch 2 Sp, Ch 2, 3 Dc in same Ch 2 Sp*, Repeat * * 2 more times. Ch 1, 3 Dc in next Ch 1 space, Ch 1, 3 Dc in last Chain 1 space, Ch 1.   Join to top of Ch 3 with Sl St. Finish off. = 16 – Dc 3 Clusters, 4 – Ch 2 Spaces, 12 – Ch 1 Spaces.

Row 5:     Join next color (Your dominant or neutral color)  to any Ch 2 space using a Sl St. Ch 3, 2 Dc in same as joining.  Ch 2, 3 Dc in same space, *Ch 1, 3 Dc in next Ch 1 Sp, Ch 1, 3 Dc in next Ch 1 Sp, Ch 1, 3 Dc in next Ch 1 Sp, Ch 1, 3 Dc in next Ch 2 Sp, Ch 2, 3 Dc in same Ch 2 Sp*, Repeat * * 2 more times. Ch 1, 3 Dc in next Ch 1 space, Ch 1, 3 Dc in next Ch 1 space, Ch 1, 3 Dc in last Ch 1 Sp, Ch 1.   Join to top of Ch 3 with Sl St. Finish off. = 20 – Dc 3 Clusters, 4 – Ch 2 Spaces, 16 – Ch 1 Spaces.

Weave in any loose ends with a yarn needle.

All Done… Congratulations on finishing week 1!!  I prefer to block these Granny Squares with a steam method.  Lay each Granny Square flat on ironing board.  Gently steam each square, being very careful not to press down on the  yarn… You will only hover over the square.  Gently manipulate each square into shape before it cools.  Leave on ironing board until completely cool.   If you prefer to block your squares by pinning them to a foam board and letting them sit that is also a great way to obtain a great shape!

Next week we will be joining these squares, so if you haven’t finished all of them… The joining will only take a small amount of time and you will be able to catch up…

Have a great week!!! Don’t forget to show up Friday evening on Facebook and share your progress. Check the Pinterest Board also… and for more discussion and fun… Hop over to Ravelry!

** My Free Patterns are made for your enjoyment.  If you find any errors, please email me at [email protected]**

*** You may make and sell products from my patterns but if you do I ask that you link back to my post. Please do not copy and post these patterns and claim it as your own. Please do not re-publish photos as your own.***

Shells & Bobbles Fingerless Gloves… Free Crochet Pattern!

Shells & Bobbles Fingerless Gloves

By Beatrice Ryan Designs

.Free Crochet Fingerless Glove Pattern

Click Here to add this fun pattern to your Raverly queue and favorites!!

.

Materials: 

Worsted Weight Yarn 200-250 Yards

      I Hook

.

Gauge:     6 Dc x 3 Rows = 2″ x 2″

.

Stitches:   Ch – Chain     Sl St – Slip Stitch     Sc – Single Crochet     Dc – Double Crochet    Sts – Stitches     Sk – Skip

.

Instructions:

Wristband

Ch 6,Turn

.

Row 1:  Sc in 2nd Ch from hook and each across. Turn. = 5 Sc

.

Row 2-24:  Ch 1, Sc in Back Loop of 1st St and each across. Turn. = 5 Sc

.

Glove Base (Working in end of wristband rows)

Row 1:  Ch 1, Sc 26 evenly across the end of rows. Turn. = 26 Sc

.

Row 2:  Ch 1, Sc in 1st St, Sk 1 St, *(Sc, Ch 2, Sc) in next St, Sk 2 Sts* Repeat 6 times,  (Sc, Ch 2, Sc) in next St, Sk 1 St, Sc in last St. Turn. = 8 Ch 2 Spaces.

.

Row 3:  Ch 3 (Counts as Dc now and through out), 5 Dc(Shell) in each Ch 2 Sp across, Dc in last St. Turn = 8 – 5 Dc Shells.

.

Row 4:  Ch 1, Sc in 1st St, Sk 2 Sts, *(Sc, Ch 2, Sc) in next St, Sk 4 Sts,* Repeat  6 times, (Sc, Ch 2, Sc) in next St, Sk 2 Sts, Sc in last St. Turn. = 8 – Ch 2 Sps

.

Rows 5-14:  Repeat rows 3 & 4 – 5 times

.

Row 15:  Ch 3 (Counts as Dc now and through out), 5 Dc(Shell) in each Ch 2 Sp across, Dc in last St. Turn = 8 – 5 Dc Shells.

.

Joining Side Seam

Starting at the top edge of the Fingerless Glove, sew the side seams of the glove together for 2″.  Skip  the next 3″ of the side seam for the thumb opening. Sew the remaining 3 ” of glove, ending at the bottom edge of the wristband. Finish off. Turn glove right side out with joining seam now on the inside.

.

Thumb Opening

Join with Sl St to any St of thumb opening. You will be working in row ends around the thumb opening and in the round.

.

Row 1:  Ch 1, Sc 28 Sts evenly around thumb opening. Join with Sl St to 1st Sc. = 28 Sc

.

Row 2:  Ch 1, 26 Sc around (Decrease 2 Sts evenly). Join with Sl St to 1st Sc. = 26 Sc

.

Row 3:  Ch 1, 20 Sc around (Decrease 6 Sts evenly). Join with Sl St to 1st Sc. = 20 Sc

.

Row 4:  Ch 1, 15 Sc around (Decrease 5 Sts evenly). Join with Sl St to 1st Sc. = 15 Sc

.

Row 5: Ch 1, Sc in 1st St, *Ch 2, Sc in next St*. Repeat around. Join with Sl St to 1st Sc. = 15 Ch 2 Sps. Finish Off.

.

** My Free Patterns are made for your enjoyment.  If you find any errors, please email me at [email protected]**

*** You may make and sell products from my patterns but if you do I ask that you link back to my post. Please do not copy and post these patterns and claim it as your own. Please do not re-publish photos as your own.***

.

.

.

.

.

.

.

%d bloggers like this: