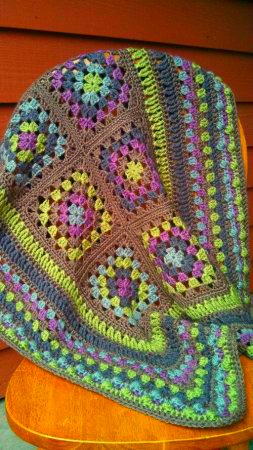
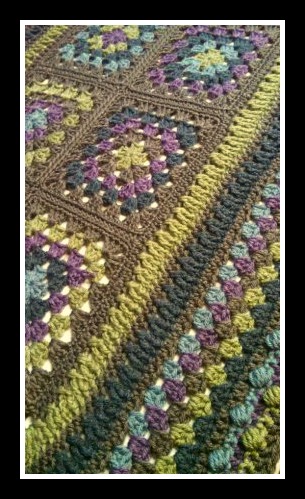
If you love my Whimsical Warmth Series… Whimsical Warmth Headband ~ Version II is the 4th free crochet pattern in the series(find the links to the other 3 patterns at the bottom of this post)… Easy to make and fun to wear, this fashionable headband pattern is set off with a beautiful set of buttons to make your accessory truly whimsical!!

Whimsical Warmth Headband Version II
If you love this pattern,,, Please add it to your Ravelry queue for easy access!! Click Here…
Materials:
Worsted Weight Yarn ~ 150 yards or less total. In this pattern I used Red Heart Soft Yarn
Shop Amazon for quick delivery… Click Here!
Or Yarnspirations for all your yarn needs… Click here!
Hook ~ H
Yarn Needle
2 Buttons
Size:
24 1/2″ Laid Flat and 22″ Around Buttoned
Gauge:
2″ x 2″ = 7 sc x 8 rows
Stitches:
yo ~ yarn over sk ~ skip
sp ~ space st ~ stitch
sl st ~ slip stitch ch ~ chain sc ~ single crochet
Hdc ~ half double crochet fphdc ~ front post half double crochet
bpfdc ~ back post half double crochet rev sc ~ reverse single crochet
dec ~ decrease (insert hook in st, pull up loop, insert hook in next st, pull up loop, yo and draw through all 3 loops on hook.)
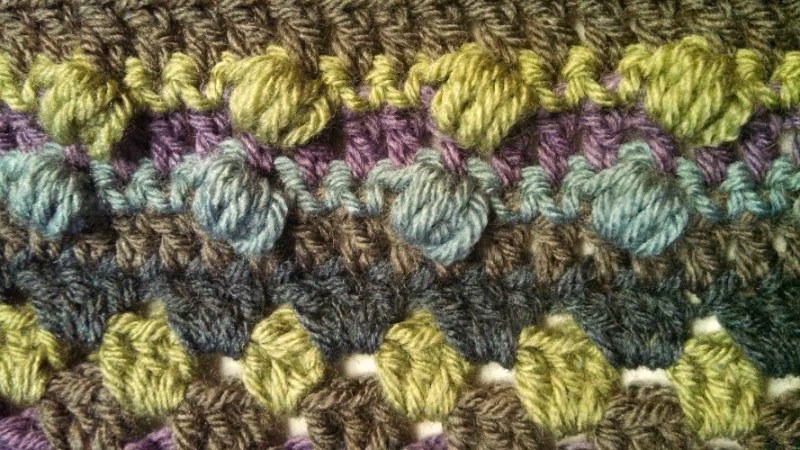
Puff Stitch ~ (Yo, insert hook in designated space, pull up a loop) 4 times, yo and pull through all 9 loops on hook, ch 1. Make sure all loop you pull up are a double crochet height.
Instructions:
Ch 64
Row 1: Sc in 2nd ch from hook and each across. = 63 sc
Row 2: Ch 1, turn, sc in 1st st, * Ch 1, sk st, sc in next st*, Repeat * * across. = 32 sc & 31 ch 1.
Row 3: Ch 2 (counts as hdc now and throughout), *puff st in next ch1-sp, ch 1*, Repeat * * arcoss to the last ch 1 sp, puff st in ch1-sp, hdc in last st. = 2 hdc, 31 puff st, 30 ch 1
Row 4: Ch 1, turn, sc in 1st st, sc in each puff st and ch1-sp across, sc in last st. = 63 sc
Rows 5- 10: Repeat rows 2-4 two more times.
Do not finish off
Botton Edging:
Row 1: Ch 1, do not turn, working along the 1st short edge of rows, sc 11 sts evenly across.
Row 2: Ch 2, turn, hdc in each st across. = 11 hdc
Row 3: Ch 2, turn, *fphdc, bphdc*, Repeat across to the last 2 sts, fphdc, hdc. = 2 hdc, 5 fphdc, 4 bphdc
Row 4: Ch 2, turn, *bphdc, fphdc*, Repeat across to the last 2 sts, bphdc, hdc. = 2 hdc, 5 bphdc, 4 fphdc
Rows 5 & 6: Repeat rows 3 – 4 one time.
Row 7: Ch 2, turn, fphdc, bphdc, ch 1, sk st(this is the 1st button hole), bphdc, fphdc, bphdc, ch 1, sk st(2nd button-hole), bphdc, fphdc, hdc. = 2 hdc, 2 ch1-sp, 3 fphdc, 4 bphdc
Row 8: Ch1, turn, dec sc, sc in next 7 sts, dec sc. = 9 sc
Row 9: Ch 1, turn, sc across. = 9 sc This is the Right Side.
Finish off.
With Right side facing, join with sl st to 2nd short end at corner.
Row 1: Ch 1, sc 11 sts evenly across.
Rows 2-6: Repeat rows 2-6 of first side button edging.
Row 7: Ch 1, turn, dec sc, sc in next 7 sts, dec sc. = 9 sc
Edging:
Ch 1, rev sc around.
Finish off.
Sew 2 button onto the base of the short end of the headband edge matching them up to the button holes. You can place the buttons correctly to make the headband fit correctly.
Congratulations… You now have a Whimsical Warmth Headband Version II

Other Whimsical Warmth Free Crochet Patterns include:
Whimsical Warmth Headband (This is made in the round and not buttoned) 
Ladies Whimsical Warmth Beanie 
Children’s Whimsical Warmth Beanie 
And, Don’t forget to follow me on my social media sites for more fun! And, most important you share your creations
Facebook, Instagram, My CAL Facebook Group, and Pinterest
I hope you love this project!! Finally, make sure to share your finished projects on my Beatrice Ryan Designs Facebook Page and make sure to share around social media too! Why share?? Because it shares our Love of Crochet!!
Until we meet again, Happy Crocheting!!!
Elena
©Copyright 2025 Elena Hunt/Beatrice Ryan Designs. All of my patterns and posts are my own work. Do not copy them in any way. If you want to share this information with someone, share the link to this post. Additionally, If you want to share on your own blog, website or social media, then you may use the first photo in this post and link back to this post. You may not give away printed copies of this post. Thank you. This post may contain affiliate link